
If you have a soft spot for the nostalgic combo of peanut butter and jelly, then you are in for a treat with this Peanut Butter Jelly Snack Bread Recipe. This delightful twist on the classic sandwich transforms those beloved flavors into a moist, tender loaf filled with jammy swirls and rich peanut butter goodness. It’s the perfect snack for any time of day—whether you want a comforting breakfast, a sweet afternoon pick-me-up, or even a no-fuss dessert without the need for frosting. Trust me, once you try this recipe, it just might become one of your all-time favorites to bake and share.
Ingredients You’ll Need
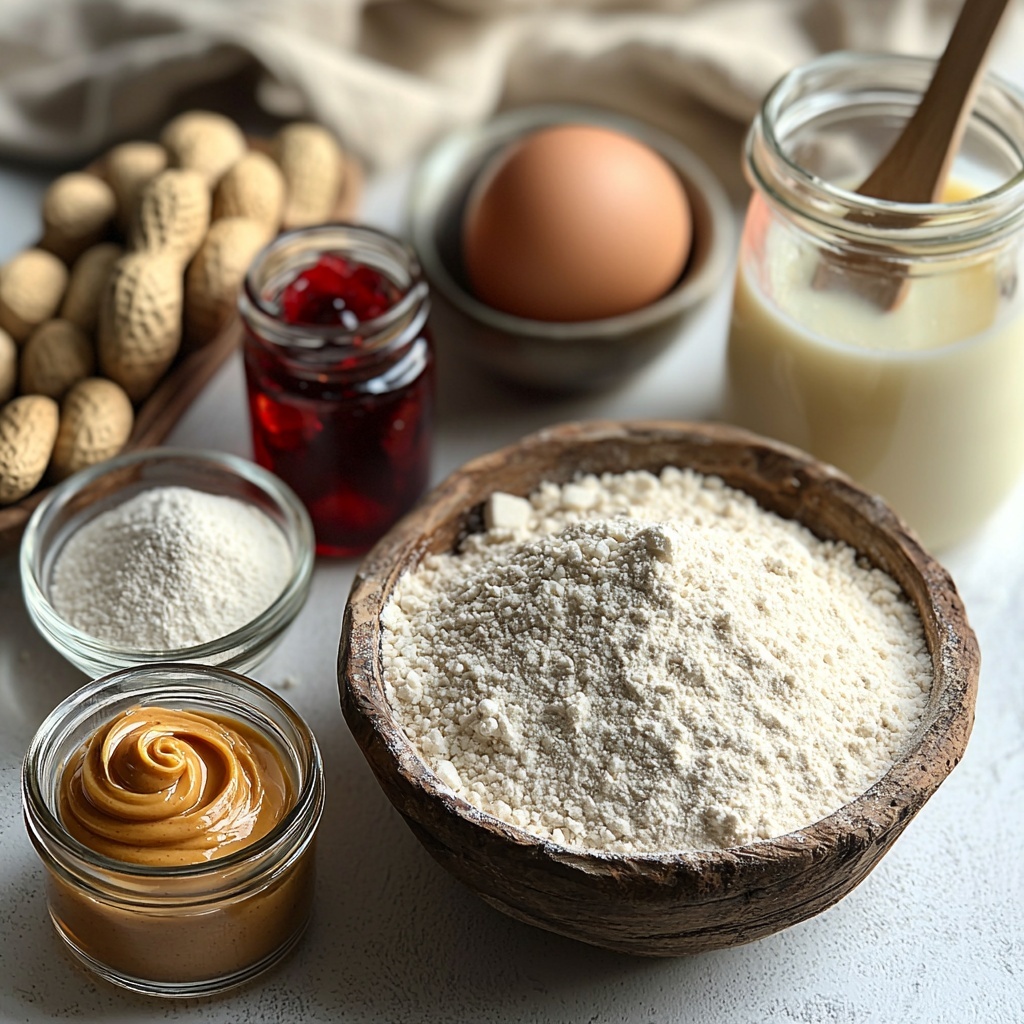
Gathering simple, pantry-friendly ingredients sets you up for an easy baking experience with wonderful results. Each component plays a crucial role in the texture and flavor of this snack bread, making the final loaf irresistibly soft, flavorful, and colorful thanks to those luscious jam swirls.
- All-purpose flour (1½ cups): Forms the sturdy yet tender base of the bread’s crumb.
- Baking powder (1 tsp): Adds lift so the loaf rises beautifully.
- Baking soda (½ tsp): Works alongside powder for a light, airy texture.
- Salt (¼ tsp): Enhances all the flavors and balances the sweetness.
- Creamy peanut butter (½ cup): Infuses the loaf with that unmistakable nutty richness.
- Sugar (½ cup): Sweetens the bread; a mix of white and brown sugar works wonders for depth.
- Large egg (1): Binds the ingredients and adds moisture.
- Milk or buttermilk (½ cup): Contributes tenderness and a mild tang if buttermilk is chosen.
- Neutral oil or melted butter (¼ cup): Keeps the loaf moist and sumptuous.
- Vanilla extract (1 tsp): Adds warm, sweet notes that complement the peanut butter perfectly.
- Jelly or jam (⅓ cup): Strawberry, grape, or any berry blend to create those sweet, vibrant pockets within the bread.
How to Make Peanut Butter Jelly Snack Bread Recipe
Step 1: Prep Your Pan and Oven
Start by preheating your oven to 350°F (175°C). Prepare a standard loaf pan by greasing it well or lining it with parchment paper to ensure your bread comes out cleanly and with perfect crust edges.
Step 2: Combine Dry Ingredients
In a medium bowl, whisk together the flour, baking powder, baking soda, and salt. This dry mix will give your bread the structure it needs to hold all those delicious flavors together.
Step 3: Mix Wet Ingredients
In a separate bowl, use a whisk or spoon to blend the creamy peanut butter and sugar until smooth and well combined. Then add the egg, milk (or buttermilk), oil or melted butter, and vanilla extract. Whisk until everything is fully integrated and slightly fluffy.
Step 4: Bring It Together
Gently fold the dry ingredients into the wet mixture just until combined. Be careful not to overmix—those little lumps will disappear during baking, and overmixing can make the bread tough instead of tender.
Step 5: Create the Swirls
Pour half of the batter into your prepared pan. Dollop half of your chosen jelly or jam evenly over the batter, then use a knife to gently swirl it through. Repeat with the remaining batter and jelly, creating those signature marbled pockets of jam throughout the bread.
Step 6: Bake to Perfection
Bake your loaf for 45 to 55 minutes, until a toothpick inserted into the center comes out mostly clean with just a few moist crumbs attached. The scent of peanut butter and berries wafting from the oven is pure magic.
Step 7: Cool Before Slicing
Let the bread cool in the pan for at least 15 minutes to allow the jelly swirls to set. This step makes slicing easier and keeps each piece intact and lovely.
How to Serve Peanut Butter Jelly Snack Bread Recipe
Garnishes
Elevate your slices with a drizzle of honey or a few chocolate chips sprinkled on top for an extra touch of indulgence. A dollop of extra jelly or a smear of crunchy peanut butter makes each bite even more special.
Side Dishes
This snack bread pairs beautifully with a cup of steaming coffee or cold milk for a comforting breakfast. For a savory contrast, serve alongside scrambled eggs or a mild cheese plate for a thoughtful brunch spread.
Creative Ways to Present
Turn your Peanut Butter Jelly Snack Bread Recipe into delightful mini loaf gifts or slice into thick pieces for a loaded dessert toast topped with fresh berries and whipped cream. You might even use it as a creative cake base for layered peanut butter desserts.
Make Ahead and Storage
Storing Leftovers
Once cooled, wrap your loaf tightly in plastic wrap or store it in an airtight container at room temperature. It stays fresh and moist for up to three days, making it a perfect make-ahead snack to enjoy throughout the week.
Freezing
This snack bread freezes beautifully. Slice it first and lay the pieces flat in a freezer-safe bag or container. When you want a quick treat, thaw a slice or two for a few minutes at room temperature or pop them straight into the toaster.
Reheating
Warm your slices gently in the microwave for about 15-20 seconds or toast lightly to bring back that freshly baked softness and liveliness in flavor. A warm slice of peanut butter jelly bread is pure comfort.
FAQs
Can I use natural peanut butter for this recipe?
Absolutely! Just make sure to stir your natural peanut butter well before measuring, as the oil tends to separate. It may create a slightly denser texture but will still deliver wonderful flavor.
What types of jelly or jam work best?
Traditional choices like strawberry, grape, and raspberry are all fantastic. Feel free to experiment with mixed berry jams or even apricot for a different fruity twist that complements the peanut butter.
Is there a way to make this recipe healthier?
Yes! You can swap the all-purpose flour for whole wheat flour for added fiber and nutrients. Using natural peanut butter, reducing sugar, or substituting with honey can also make it a bit healthier without sacrificing too much taste.
Can I make this recipe into muffins or mini loaves?
Definitely. Just adjust baking time to about 18-22 minutes for muffins and check doneness with a toothpick. Mini loaves bake in roughly 30-35 minutes. Perfect for portion control or gifting.
Do I have to use oil, or can I substitute butter?
Either works well! Oil makes the bread super moist, while melted butter imparts a richer flavor and slightly denser crumb. Choose according to your preference or what you have on hand.
Final Thoughts
This Peanut Butter Jelly Snack Bread Recipe is a complete game changer if you love the comfort of a PB&J but want to enjoy it in a new, fun way. Soft, swirled, and sweet, it’s the perfect bake to share or keep all to yourself. I hope you enjoy making it as much as I have, and that it becomes a staple in your snack rotation!
Print
Peanut Butter Jelly Snack Bread Recipe
- Prep Time: 15 minutes
- Cook Time: 50 minutes
- Total Time: 1 hour 5 minutes
- Yield: 1 loaf (8 slices)
- Category: Snack Bread
- Method: Baking
- Cuisine: American
Description
This Peanut Butter Jelly Snack Bread is a delightful twist on the classic PB&J sandwich, featuring a soft, moist crumb infused with real peanut butter flavor and pockets of sweet, fruity jelly. Perfectly sweet for dessert and refreshing enough for breakfast, it requires no frosting but can be enhanced with optional toppings like a peanut butter crumble or honey drizzle.
Ingredients
Dry Ingredients
- 1½ cups all-purpose flour
- 1 tsp baking powder
- ½ tsp baking soda
- ¼ tsp salt
Wet Ingredients
- ½ cup creamy peanut butter
- ½ cup sugar (or ¼ cup white + ¼ cup brown sugar)
- 1 large egg
- ½ cup milk (or buttermilk for extra tenderness)
- ¼ cup neutral oil or melted butter
- 1 tsp vanilla extract
Swirl
- ⅓ cup jelly or jam (strawberry, grape, raspberry, or mixed berry)
Instructions
- Preheat and prepare: Preheat your oven to 350°F (175°C). Grease a standard loaf pan or line it with parchment paper to prevent sticking.
- Combine dry ingredients: In a medium bowl, mix together the all-purpose flour, baking powder, baking soda, and salt until evenly distributed.
- Mix wet ingredients: In a separate large bowl, whisk the creamy peanut butter and sugar together until the mixture is smooth and creamy. Then add the egg, milk (or buttermilk), neutral oil or melted butter, and vanilla extract; whisk until fully combined.
- Combine wet and dry: Gently fold the dry ingredients into the wet ingredients just until combined. Be careful not to overmix to maintain a tender crumb.
- Layer batter and jelly: Pour half of the batter into the prepared loaf pan. Dollop half of the jelly on top of the batter and swirl gently with a knife to create marbled pockets of flavor. Repeat with the remaining batter and jelly.
- Bake: Place the loaf pan in the oven and bake for 45 to 55 minutes, or until a toothpick inserted into the center comes out mostly clean with a few moist crumbs attached.
- Cool and slice: Allow the bread to cool in the pan for at least 15 minutes. This cooling step helps the jelly set properly, making it easier to slice.
Notes
- Optional peanut butter crumble topping can be made by mixing peanut butter, sugar, flour, and butter and sprinkled on top before baking.
- Chocolate chips can be added to the batter for a delicious peanut butter and chocolate combination.
- A honey drizzle can be used instead of glaze for added sweetness.
- For texture, use crunchy peanut butter instead of creamy.
- Store the bread wrapped at room temperature for up to 3 days.
- Freeze the bread by slicing it first and then freezing slices individually for convenience.
- This recipe can be made healthier by using whole wheat flour or adapted into mini loaves or muffins.
- Peanut butter glaze can be added optionally to enhance flavor.
- The recipe can be customized for kids’ snacks or lunchboxes.


