
If you’ve ever dreamed of biting into a sweet, velvety treat that balances rich chocolate with buttery, gooey caramel, then this Homemade Chocolate Caramels Recipe is your new best friend. It’s a delightful blend of creamy caramel enveloped in luscious chocolate, finished with a sprinkle of coarse sea salt to bring out every flavor note. Perfect for gifting or keeping all to yourself, this recipe transforms simple ingredients into a mouthwatering confection that’s hard to resist.
Ingredients You’ll Need
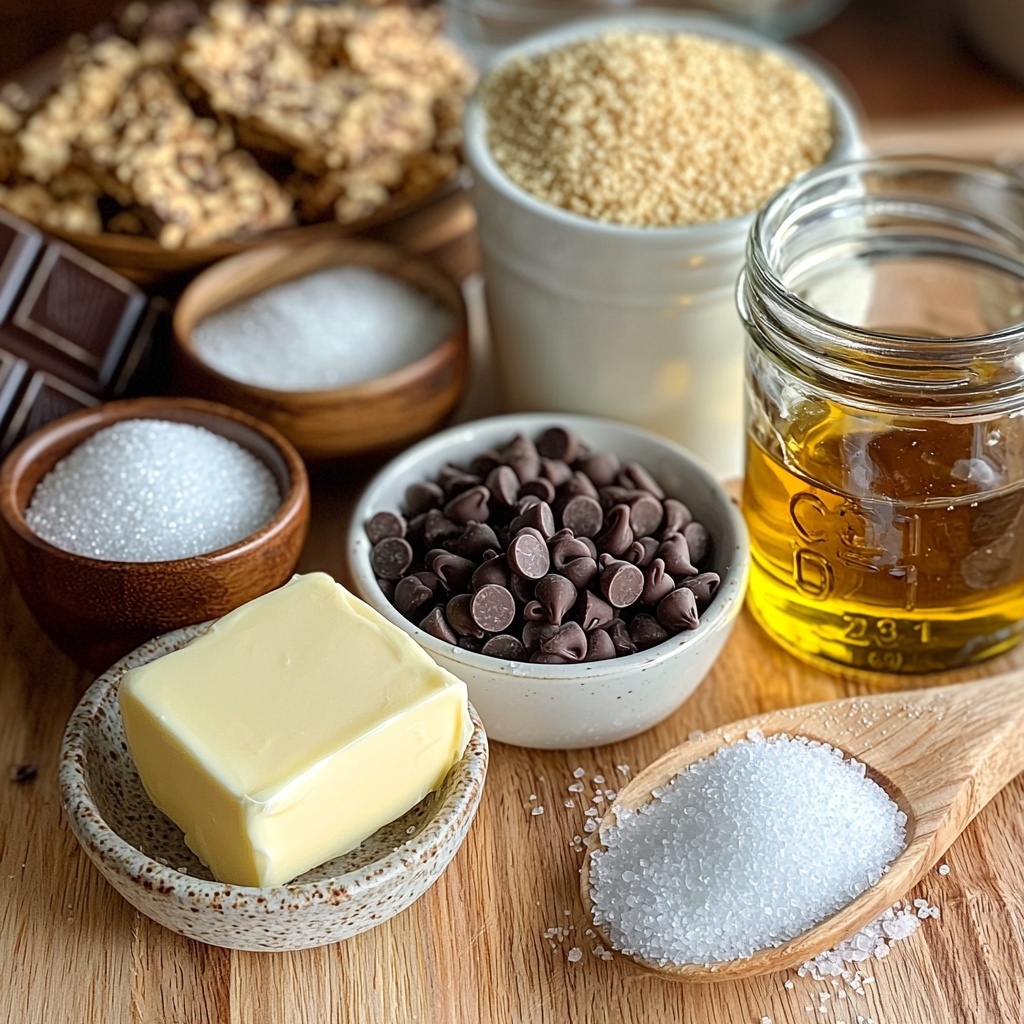
This Homemade Chocolate Caramels Recipe uses a handful of trusty ingredients that are both straightforward and magical when combined. Each component plays a key role in achieving that irresistible texture and flavor—from the sweetness of sugars and creaminess of condensed milk to the shiny finish of chocolate and the perfect touch of salt.
- ¼ cup butter: Adds richness and helps create that smooth, tender caramel texture.
- ½ cup sugar: Provides sweetness and helps the caramel develop a beautiful, golden color.
- ½ cup brown sugar: Brings moisture and a subtle molasses depth to the caramel’s flavor.
- ½ cup light corn syrup: Prevents crystallization and keeps the caramel silky and soft.
- ½ cup sweetened condensed milk: Enhances creaminess and adds a sweet, milky richness.
- 3 cups milk chocolate chips: For coating and dipping, offering a smooth, melt-in-your-mouth chocolate experience.
- 2 teaspoons vegetable oil: Helps melt the chocolate smoothly for a shiny coating.
- 1 teaspoon coarse sea salt (for topping): Provides a delightful contrast that elevates the sweet flavors perfectly.
How to Make Homemade Chocolate Caramels Recipe
Step 1: Blend the Caramel Ingredients
Start by combining butter, sugar, brown sugar, corn syrup, and sweetened condensed milk in a microwave-safe bowl. Stir them together until the mixture is smooth and evenly blended. This step ensures the sugars start melting and mingle with the creamy ingredients, setting the base for luscious caramel.
Step 2: Cook Your Caramel
Place the bowl in the microwave and cook the mixture for a total of 6 minutes, stirring every 2 minutes. This gentle cooking helps thicken the caramel while preventing it from burning or sticking. Be patient here—the stirring is key to smooth and evenly cooked caramel.
Step 3: Set the Caramel
Once cooked, pour the hot caramel into a 9 x 9 inch baking pan. Spread it evenly and let it cool completely. Cooling is crucial because it helps the caramel firm up just enough to be cut into neat, bite-sized squares without being too sticky or soft.
Step 4: Dip and Coat in Chocolate
After the caramel has set, cut it into squares. Melt the milk chocolate chips with 2 teaspoons of vegetable oil until smooth and glossy. Dip each caramel square into the melted chocolate, making sure every piece is fully coated.
Step 5: Final Touch with Sea Salt
Place the chocolate-dipped caramels on a wax paper-lined baking sheet and sprinkle each one with coarse sea salt while the chocolate is still wet. This salty sprinkle not only looks divine but balances the sweetness to perfection. Allow the chocolate to harden at room temperature before serving or storing.
How to Serve Homemade Chocolate Caramels Recipe
Garnishes
Sprinkling coarse sea salt on each caramel is the classic touch, but you can also experiment with finely chopped nuts, edible gold dust, or a drizzle of white chocolate for an elegant flair. These garnishes add texture and visual appeal that will impress anyone who sees these treats.
Side Dishes
While these caramels shine as a stand-alone indulgence, pairing them with a cup of rich coffee, hot cocoa, or a full-bodied dessert wine makes the experience even more memorable. The warm or boozy notes complement the sweet-salty flavors beautifully.
Creative Ways to Present
Consider arranging your homemade caramels in a decorative box lined with parchment paper for gifting, or stack them in a glass jar with a festive ribbon for a charming kitchen display. You could even use them as a party favor or garnish to elevate an elegant dessert plate.
Make Ahead and Storage
Storing Leftovers
Wrap your Homemade Chocolate Caramels Recipe in wax paper or place them in an airtight container. Store them at room temperature, away from heat or direct sunlight, where they’ll stay fresh and chewy for 3-4 days.
Freezing
If you want to keep them longer, these caramels freeze beautifully. Place them in a freezer-safe container separated by parchment paper to prevent sticking. They can be frozen for up to 2 months without losing flavor or texture.
Reheating
To enjoy them after freezing, simply let the caramels thaw at room temperature for about an hour. Avoid microwaving as it can cause the chocolate to bloom or the caramel to soften too much. Enjoy them as if freshly made!
FAQs
Can I use dark chocolate instead of milk chocolate?
Absolutely! Dark chocolate creates a more intense, less sweet coating for your caramels. It’s a great variation if you prefer a richer chocolate flavor or want to balance out the caramel’s sweetness.
Why is corn syrup used in this recipe?
Corn syrup helps prevent the sugar from crystallizing, which keeps your caramel soft and smooth rather than grainy. It’s the secret ingredient that gives these caramels their perfect chewy texture.
What’s the best way to cut the caramel without it sticking?
Use a sharp knife sprayed or dipped lightly in hot water between cuts. This prevents sticking and lets you slice clean, pretty squares of caramel with ease.
Can I make these caramels on the stove instead of the microwave?
Yes, you can cook the caramel ingredients on the stove over medium heat, stirring constantly, until the mixture thickens and achieves the right consistency. The microwave method is just quicker and convenient.
What type of sea salt works best for topping?
Coarse flaky sea salt like Maldon is ideal because it adds crunch and looks beautiful sprinkled on top. It melts less easily, preserving that perfect salty accent on your chocolates.
Final Thoughts
Making your own Homemade Chocolate Caramels Recipe is a joyful, rewarding process that fills your home with tempting aromas and your heart with pride. These sweet treats are a perfect blend of creamy caramel and smooth chocolate with a salty kiss, guaranteed to impress family and friends. So go ahead, gather your ingredients, and dive into this delicious project—you won’t regret creating your very own batch of caramel magic!
Print
Homemade Chocolate Caramels Recipe
- Prep Time: 15 minutes
- Cook Time: 6 minutes
- Total Time: 1 hour 20 minutes
- Yield: 24 servings
- Category: Candy
- Method: Microwaving
- Cuisine: American
Description
These Homemade Chocolate Caramels are a delightful treat combining creamy caramel coated with rich milk chocolate and a touch of sea salt for a perfect balance of sweet and salty. Easy to make with simple ingredients and minimal equipment, these caramels are a perfect indulgence for any occasion.
Ingredients
Caramel
- ¼ cup butter
- ½ cup sugar
- ½ cup brown sugar
- ½ cup light corn syrup
- ½ cup sweetened condensed milk
Coating
- 3 cups milk chocolate chips
- 2 teaspoons vegetable oil
Topping
- 1 teaspoon coarse sea salt
Instructions
- Prepare the caramel mixture: Combine butter, sugar, brown sugar, light corn syrup, and sweetened condensed milk in a microwave-safe bowl. Stir until the mixture is smooth and well combined.
- Cook the caramel: Microwave the mixture for 6 minutes, stopping every 2 minutes to stir thoroughly. This helps ensure the caramel cooks evenly and prevents scorching.
- Set the caramel: Pour the hot caramel mixture into a 9 x 9 inch baking pan. Allow it to cool completely at room temperature until firm enough to cut into squares.
- Dip in chocolate: Melt the milk chocolate chips with vegetable oil in a microwave-safe bowl until smooth. Dip each caramel square into the melted chocolate, coating evenly, then place onto a wax paper-lined baking sheet.
- Add finishing touch: Sprinkle each chocolate-coated caramel with coarse sea salt while the chocolate is still wet. Let the chocolate harden completely at room temperature before serving or storing.
Notes
- Stir the caramel mixture well during microwaving to prevent burning and ensure even cooking.
- Use wax paper when setting dipped caramels to avoid sticking.
- For firmer caramels, refrigerate after pouring into the pan.
- Store caramels in an airtight container at room temperature for up to 2 weeks.
- Coarse sea salt enhances the flavor by balancing the sweetness.


