
“`html
If you’re craving a naturally sweet and indulgent treat that ticks all the boxes for health and flavor, let me introduce you to the Coconut Bliss Balls Vegan Gluten Free: 5 Steps to Delight Recipe. These little bites of joy are packed with wholesome ingredients like dates, shredded coconut, and almond flour, creating a chewy, rich, and utterly satisfying snack that feels like a mini celebration every time you pop one in your mouth. They’re perfect for anyone looking for a guilt-free sweet fix that’s both vegan and gluten free, with a wonderfully balanced texture and flavor you’ll want to make again and again.
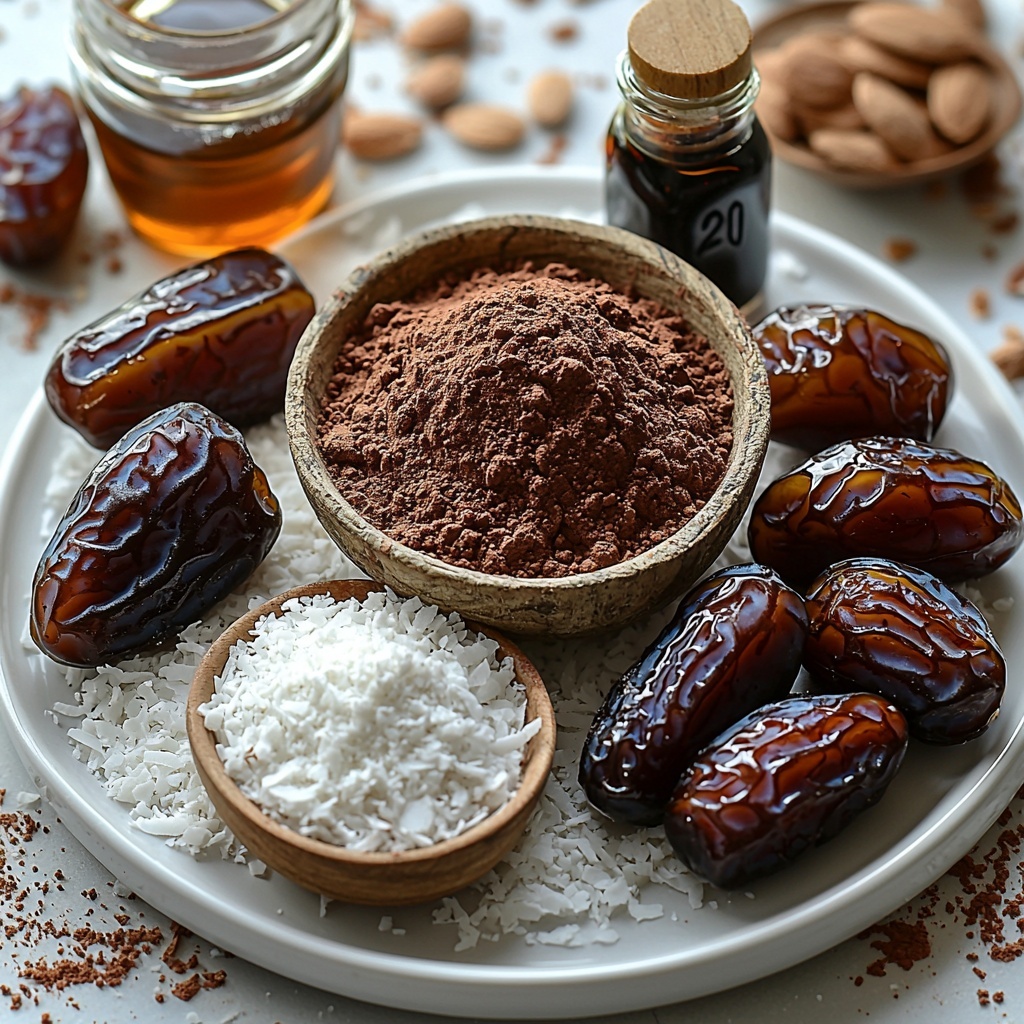
Ingredients You’ll Need
Getting started on this recipe is a breeze because all the ingredients are simple, yet each plays a crucial role in crafting the perfect Coconut Bliss Balls. They come together to create that ideal mix of moistness, nuttiness, and sweetness that these bites are known for.
- 1 cup shredded coconut: Adds that signature coconut flavor and a delightful chewy texture.
- 1 cup dates, pitted: Natural sweetness and sticky binding power without any refined sugar.
- 1/2 cup almond flour: Brings a subtle nuttiness and helps hold everything together.
- 1/4 cup cocoa powder: Infuses a rich, chocolaty depth without overpowering the coconut.
- 1/4 cup maple syrup: Enhances sweetness with a lovely, smooth finish.
- 1 tsp vanilla extract: Adds warmth and rounds out the flavors beautifully.
- Pinch of salt: Balances the sweetness and intensifies the overall taste.
How to Make Coconut Bliss Balls Vegan Gluten Free: 5 Steps to Delight Recipe
Step 1: Combine the Base Ingredients
Pop the dates, almond flour, cocoa powder, maple syrup, vanilla extract, and a pinch of salt into your food processor. This combination is where the magic starts, blending the foundational flavors and setting the stage for a perfectly sticky mixture.
Step 2: Pulse to a Sticky Mixture
Give everything a few pulses until the mixture comes together and becomes sticky, holding the ingredients in a dough-like consistency. This is crucial, as the sticky texture will help your bliss balls keep their shape without crumbling.
Step 3: Add Shredded Coconut and Mix
Now, add the shredded coconut and give the food processor a few more pulses. The coconut should be evenly incorporated, distributing its wonderful texture and tropical flavor throughout the mixture.
Step 4: Roll into Small Balls
Time to get your hands in there! Scoop out spoonfuls and roll the mixture between your palms to create small, bite-sized balls. This hands-on step is one of the most satisfying, and makes portioning effortless.
Step 5: Chill and Set
Place your rolled bliss balls in the refrigerator for about 30 minutes. Chilling helps them firm up so they hold their shape beautifully and the flavors meld together for an even more delicious experience.
How to Serve Coconut Bliss Balls Vegan Gluten Free: 5 Steps to Delight Recipe
Garnishes
For a little extra pizzazz, try rolling your bliss balls in extra shredded coconut, cocoa powder, or crushed nuts just before serving. This adds a lovely decorative touch and a burst of texture that makes the presentation pop at any gathering.
Side Dishes
Coconut Bliss Balls pair wonderfully with a cup of herbal tea or a frothy almond milk latte for a sweet snack break. They also complement fresh fruit platters wonderfully, adding a rich, satisfying contrast to light, juicy flavors.
Creative Ways to Present
Arrange your bliss balls in cute little paper cupcake liners or serve them on a wooden board alongside other healthy treats like dried fruit and nuts. You can even skewer them for a playful dessert kabob—a fun twist that’s perfect for parties or lunchbox surprises.
Make Ahead and Storage
Storing Leftovers
Once made, Coconut Bliss Balls should be stored in an airtight container in the refrigerator, where they will stay fresh and delicious for up to 3-4 days. This makes them an ideal make-ahead snack for busy weeks or meal prep enthusiasts.
Freezing
If you want to keep these delightful treats longer, they freeze beautifully. Place the bliss balls in a single layer on a baking sheet, freeze until firm, then transfer to a freezer-safe container or bag. They’ll keep well frozen for 2-3 months and thaw quickly in the fridge when you’re ready to enjoy them.
Reheating
Since Coconut Bliss Balls are meant to be enjoyed chilled or at room temperature, reheating is not necessary and can affect their texture. Simply take them out of the fridge or freezer and let them come to room temperature before indulging.
FAQs
Can I use other nuts instead of almond flour?
Absolutely! You can substitute almond flour with cashew flour, hazelnut flour, or even finely ground walnuts. Just keep in mind that the flavor and texture might vary slightly depending on the nut.
Are these bliss balls suitable for kids?
Definitely! These Coconut Bliss Balls are naturally sweet, nutritious, and free of common allergens like gluten and dairy, making them a wholesome treat for little ones and adults alike.
What kind of dates work best?
Medjool dates are the best choice here because they’re soft, sweet, and easy to blend. If your dates are a bit dry, soak them in warm water for 10 minutes to soften before processing.
Can I make these nut-free?
You sure can! To keep the recipe nut-free, swap almond flour for oat flour or sunflower seed flour and ensure your ingredients are processed in a nut-free environment.
How sticky will the mixture be?
The mixture should be nicely sticky but manageable to roll with your hands. If it feels too dry, add a tiny splash of water or more maple syrup; if too wet, sprinkle in a bit more almond flour or shredded coconut.
Final Thoughts
Trust me, once you try the Coconut Bliss Balls Vegan Gluten Free: 5 Steps to Delight Recipe, these sweet little bites will become your go-to snack for any time of day. They offer a beautiful balance of flavor and nutrition, all wrapped up in a deliciously easy-to-make package. Whether you’re sharing them with friends or keeping them all to yourself, they’re guaranteed to bring a bit of coconut bliss to your life.
“`
Print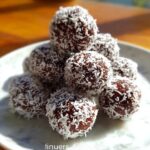
Coconut Bliss Balls Vegan Gluten Free: 5 Steps to Delight Recipe
- Prep Time: 10 minutes
- Cook Time: 0 minutes
- Total Time: 40 minutes
- Yield: 12 servings
- Category: Snack
- Method: No-Cook
- Cuisine: Vegan
- Diet: Gluten Free
Description
These Coconut Bliss Balls are a delicious and healthy vegan, gluten-free treat made with natural ingredients like dates, shredded coconut, and almond flour. Perfect for a quick snack or a guilt-free dessert, these no-bake bliss balls come together in minutes and offer a delightful combination of cocoa and coconut flavors.
Ingredients
Ingredients
- 1 cup shredded coconut
- 1 cup dates, pitted
- 1/2 cup almond flour
- 1/4 cup cocoa powder
- 1/4 cup maple syrup
- 1 tsp vanilla extract
- Pinch of salt
Instructions
- Combine Ingredients: In a food processor, combine the pitted dates, almond flour, cocoa powder, maple syrup, vanilla extract, and a pinch of salt to create the flavor base.
- Pulse Mixture: Pulse the mixture until it forms a sticky, well-blended consistency suitable for shaping.
- Add Coconut: Add the shredded coconut to the mixture, then pulse again to integrate it evenly without over-processing.
- Roll Into Balls: Using your hands, scoop portions of the mixture and roll them into small, bite-sized balls.
- Chill: Place the formed balls in the refrigerator and chill for 30 minutes to firm up and enhance the texture.
- Serve: Remove from the fridge and enjoy your delicious, healthy coconut bliss balls.
Notes
- Ensure dates are soft for easier blending; if dry, soak them in warm water for 10 minutes prior.
- Store the bliss balls in an airtight container in the refrigerator for up to one week.
- For a nuttier flavor, consider rolling the finished balls in extra shredded coconut.
- This recipe is naturally sweetened; adjust maple syrup quantity to taste if desired.


