
“`html
There is something incredibly fun and irresistible about the Blooming Chicken Quesadilla Ring Recipe. Imagine a ring of crispy, cheesy tortilla cones filled with a creamy and flavorful chicken mixture, baked to golden perfection and served with classic Mexican sides like salsa, guacamole, and sour cream. It’s like your favorite quesadilla got a spectacular upgrade that’s perfect for parties, family dinners, or anytime you want to impress without fuss. This dish brings together creamy textures, sharp cheeses, and vibrant veggies in a warm, shareable form that invites smiles and second helpings.
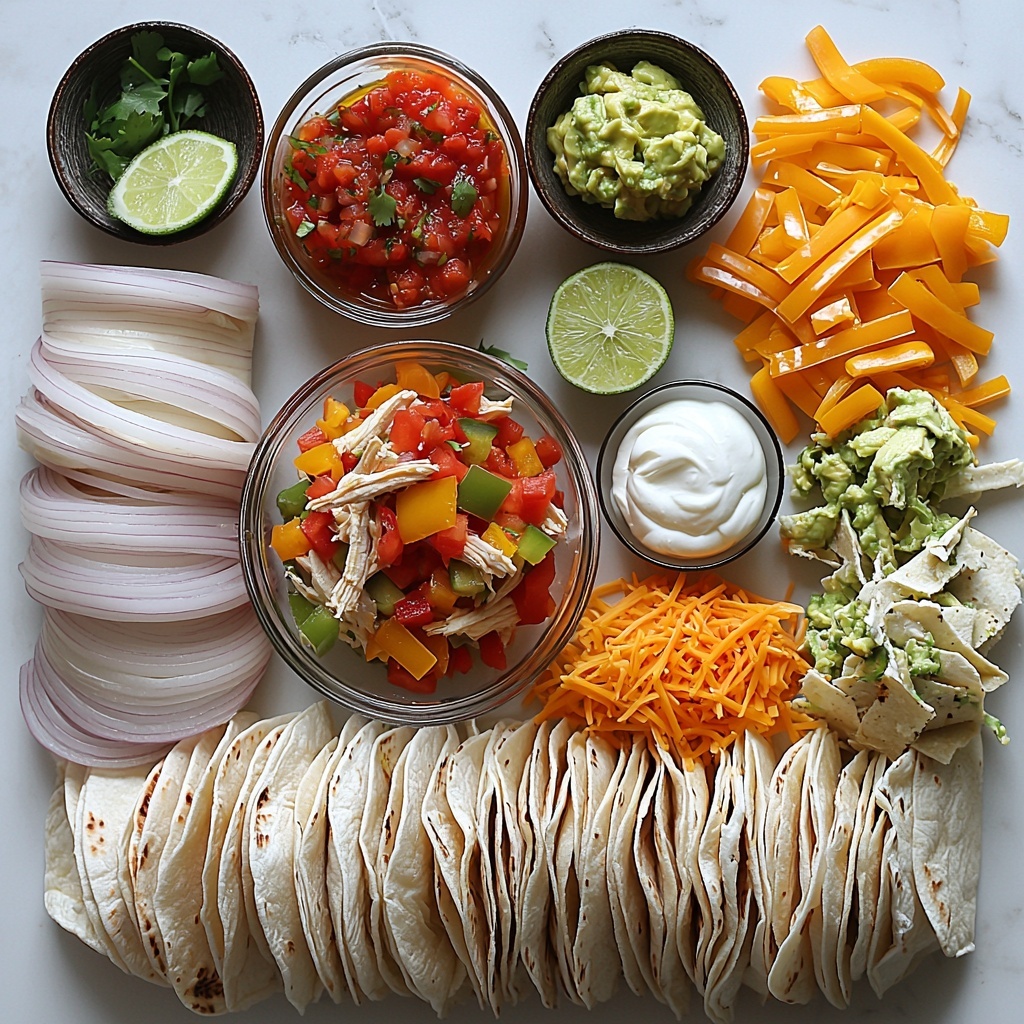
Ingredients You’ll Need
The ingredients for this recipe are simple but incredibly impactful. Each brings color, texture, and that perfect blend of flavors that make the Blooming Chicken Quesadilla Ring Recipe so memorable. From the melty cheeses to the fresh lime juice and savory taco seasoning, every element plays an essential role in creating those luscious bites you’ll keep reaching for.
- 2 tablespoons olive oil: For sautéing the onions and peppers to bring out their sweetness and add a gentle richness.
- 1 medium onion (thinly sliced): Adds a subtle crunch and mild sharpness that balances the creamy chicken filling.
- 2 bell peppers (sliced, red, yellow, green, or orange, or combination): These colorful peppers add freshness, sweetness, and a beautiful pop of color.
- 8 ounces cream cheese (at room temperature, 1 brick, 250 grams): The creamy base that holds everything together with silky smoothness.
- ¼ cup sour cream (or plain Greek yogurt): Adds a tangy and luscious note to the chicken filling.
- 1 tbsp lime juice: A bright splash that lifts the whole filling with zesty freshness.
- ¼ cup mozzarella cheese (shredded): For a gooey, melty texture that stretches deliciously.
- ¼ cup cheddar cheese (shredded): Brings sharpness and warmth to the cheesy goodness.
- 1 ½ tbsp taco seasoning: Packs a flavorful punch of spices, making the chicken filling savory and perfectly seasoned.
- 3 cups cooked chicken (shredded, rotisserie or homemade): The hearty protein that makes this dish satisfying and filling.
- 12 medium flour tortillas (10″ – 12″ size): The flexible and crispy shells that form the beautiful ring shape.
- ¼ cup cheddar cheese (shredded): For sprinkling between layers to amp up the cheesiness.
- ¼ cup mozzarella cheese (shredded): More melty cheese sprinkled on top for that irresistible golden blanket.
- Cooking spray: Ensures the edges crisp up just right without sticking.
- 3 green onions (thinly sliced): Optional garnish to add a fresh, mild onion finish.
- Salsa: The classic dip that pairs beautifully with the quesadilla ring.
- Guacamole: Adds creamy avocado goodness and balances the spices.
- Sour cream: For cool, tangy dipping alongside the bold flavors.
How to Make Blooming Chicken Quesadilla Ring Recipe
Step 1: Prepare Your Oven and Veggies
Start by preheating your oven to 375℉ and lining a large baking sheet or pizza tray with parchment paper or greased foil for easy cleanup. Then heat 2 tablespoons of olive oil in a large skillet over medium heat, toss in your thinly sliced onion and colorful bell peppers, and sauté until they soften and turn golden brown. This usually takes around 5 to 6 minutes and develops a sweet, rich base flavor for your filling. Once done, set aside to cool while you prepare the rest.
Step 2: Whip Up the Creamy Chicken Filling
In a large mixing bowl, combine the softened cream cheese, sour cream, and lime juice. Adding lime juice here brightens up the rich creaminess with a lovely tang. Then stir in the shredded mozzarella and cheddar cheeses along with the taco seasoning — this seasoning is the flavor hero that really ties the savory notes together. Finally, fold in the shredded cooked chicken and the cooled sautéed veggies. Mix everything gently until well combined, making sure each bite will have that perfect balance of creamy, cheesy, and spiced goodness.
Step 3: Craft the Tortilla Cones
Take your 12 medium flour tortillas and slice each in half, giving you 24 semi-circular pieces ready to be filled. Spoon about 1.5 to 2 tablespoons of the chicken mixture onto each tortilla half, spreading it evenly but leaving a small border around the edges. Then carefully roll each tortilla half into a tight cone shape. They should be firm enough to hold together without squeezing out the filling. These cones are going to bloom beautifully in the oven, so take your time to shape them just right.
Step 4: Assemble the Quesadilla Ring
Place a small round bowl in the center of your prepared baking sheet — this helps create that iconic ring shape. Arrange half of your filled tortilla cones around the bowl, with the points of each cone touching the bowl to form a sturdy base layer. Sprinkle half of your shredded cheddar and mozzarella cheese over this bottom layer for extra cheesy goodness. Then, add the remaining cones on top to create a second layer, and finish with the rest of the shredded cheese.
Step 5: Bake It to Golden Perfection
Remove the bowl from the center carefully, then spray the edges of the tortillas with cooking spray or brush lightly with oil to encourage crispiness. Pop the ring in the middle rack of your oven and bake for about 15 to 20 minutes. You’ll know it’s ready when the cheese is melted and bubbly, and the edges of the tortillas turn a perfect golden brown with a crisp crunch. Once baked, carefully transfer your blooming chicken quesadilla ring to a serving platter.
Step 6: Add Finishing Touches
If you want to add a splash of fresh color and mild onion flavor, sprinkle the thinly sliced green onions over the top. Place a small bowl of salsa right in the center of the ring, with additional bowls of guacamole and sour cream on the side. Now you’re all set for a festive, mouthwatering presentation!
How to Serve Blooming Chicken Quesadilla Ring Recipe
Garnishes
Thinly sliced green onions add a delightful fresh crunch and a mild pop of color that complements the creamy, cheesy layers perfectly. For an extra touch, a sprinkle of chopped fresh cilantro or a few dashes of smoked paprika can add more depth and vibrancy.
Side Dishes
This quesadilla ring pairs beautifully with classic Mexican sides like fresh salsa, creamy guacamole, and cool sour cream — all perfect for dipping. You can also serve a crisp green salad, Mexican rice, or a simple corn salad to add some refreshing balance to the richness.
Creative Ways to Present
Try presenting your Blooming Chicken Quesadilla Ring Recipe with colorful serving bowls for dips nestled in the center. For a fun twist, add small skewers with mini jalapeños or cherry tomatoes around the platter. This festive presentation will make sharing more interactive and visually appealing at any gathering.
Make Ahead and Storage
Storing Leftovers
Once cooled, place any leftover quesadilla ring pieces in an airtight container and refrigerate. They’ll stay fresh and delicious for 3 to 4 days, making a fantastic next-day meal or snack packed with flavor.
Freezing
You can freeze portions of the quesadilla cones before baking. Arrange them on a baking sheet to freeze individually, then pack into freezer-safe bags or containers. Frozen quesadilla cones will keep well for up to one month. When ready to enjoy, thaw overnight in the refrigerator and bake as directed.
Reheating
For best results, reheat leftover Blooming Chicken Quesadilla Ring Recipe pieces in the oven at 350℉ for about 10 to 15 minutes or until warmed through and crispy again. Avoid microwaving if possible, as the texture can become soggy.
FAQs
Can I use flour tortillas of different sizes?
Yes! The recommended size is 10 to 12 inches because it’s just perfect for rolling cones with enough filling, but slightly smaller or larger tortillas can work. Just adjust the filling amounts accordingly and keep an eye on baking time as smaller cones might crisp faster.
Is there a vegetarian version of the Blooming Chicken Quesadilla Ring Recipe?
Absolutely! Substitute the shredded chicken with sautéed mushrooms, black beans, or a mix of roasted vegetables. The creamy cheese and taco seasoning will still provide tons of flavor.
Can I prepare the filling a day in advance?
You sure can! Mixing the creamy chicken filling ahead of time lets the flavors meld beautifully. Just cover tightly and refrigerate, then fill and assemble right before baking.
What’s the best way to reheat without drying it out?
Reheating in the oven at a moderate temperature keeps the quesadilla ring crisp without drying. If you’re in a hurry, cover the pieces loosely with foil to help retain moisture while warming.
Can I add extra spice to the recipe?
Definitely! Feel free to add chopped jalapeños or a sprinkle of chili powder to the chicken filling. You can also serve spicy salsa or hot sauce alongside for those who like a fiery kick.
Final Thoughts
Trust me, once you try the Blooming Chicken Quesadilla Ring Recipe, it’ll become a staple in your recipe box for fun gatherings or cozy nights in. It’s a delightful way to enjoy familiar ingredients with a fresh, shareable twist that everybody loves. So grab your tortillas and let the cheesy, savory fiesta begin!
“`
Print
Blooming Chicken Quesadilla Ring Recipe
- Prep Time: 15 minutes
- Cook Time: 15 minutes
- Total Time: 30 minutes
- Yield: 24 servings
- Category: Appetizer
- Method: Baking
- Cuisine: Mexican-American
Description
This Blooming Chicken Quesadilla Ring is a delightful and visually impressive appetizer or party dish featuring layers of creamy, cheesy chicken filling wrapped in crispy toasted tortillas. Loaded with sautéed peppers and onions, seasoned chicken, and a blend of mozzarella and cheddar cheeses, this ring is baked to golden perfection and served with salsa, guacamole, and sour cream for dipping. Perfect for gatherings and easy to share, it combines bold flavors with a fun presentation.
Ingredients
Vegetable Sauté
- 2 tablespoons olive oil
- 1 medium onion, thinly sliced
- 2 bell peppers, sliced (red, yellow, green, or orange, or combination)
Chicken Filling
- 8 ounces cream cheese, at room temperature (1 brick, 250 grams)
- ¼ cup sour cream or plain Greek yogurt
- 1 tbsp lime juice
- ¼ cup mozzarella cheese, shredded
- ¼ cup cheddar cheese, shredded
- 1 ½ tbsp taco seasoning
- 3 cups cooked chicken, shredded (rotisserie or homemade)
- Cooked sautéed onions and bell peppers (from above)
Assembly
- 12 medium flour tortillas (10″ – 12″)
- Additional ¼ cup cheddar cheese, shredded
- Additional ¼ cup mozzarella cheese, shredded
- Cooking spray or oil for brushing
Garnish & Serving
- 3 green onions, thinly sliced
- Salsa for dipping
- Guacamole for dipping
- Sour cream for dipping
Instructions
- Preheat Oven: Preheat your oven to 375℉ and prepare a large baking sheet or pizza tray by lining it with parchment paper or greased foil to prevent sticking.
- Sauté Vegetables: Heat olive oil in a large frying pan or skillet over medium heat. Add the thinly sliced onion and bell peppers and sauté for 5-6 minutes until softened and golden brown, stirring often to prevent burning. Set aside to cool.
- Prepare Chicken Mixture: In a large bowl, combine the cream cheese (at room temperature), sour cream, lime juice, shredded mozzarella, shredded cheddar, and taco seasoning. Mix until smooth and evenly blended.
- Combine Filling Ingredients: Add the shredded cooked chicken and the cooled sautéed onions and peppers to the cheese mixture. Gently fold everything together until well combined. Set aside.
- Slice Tortillas: Cut each of the 12 medium flour tortillas in half to create 24 semi-circles for rolling.
- Fill Tortillas: Evenly divide the chicken filling among the tortilla halves, placing about 1.5 to 2 tablespoons on each. Spread the filling, leaving a small border around the edges for easier rolling.
- Roll into Cones: Carefully roll each filled tortilla half into a cone shape, ensuring it is tight enough to hold together but not so tight that the filling oozes out.
- Prepare Baking Tray: Place a small round bowl in the center of the lined baking tray to form the ring shape.
- Arrange Base Layer: Position half of the rolled cones around the bowl with the pointed ends touching the bowl, creating the base of the quesadilla ring.
- Add Cheese to Base: Sprinkle half of the remaining shredded cheddar and mozzarella cheeses over this base layer of cones to add cheesy melt and flavor.
- Add Second Layer: Place the remaining cones on top of the base layer to form a second level, then top with the remaining cheddar and mozzarella cheeses. Remove the bowl from the center carefully to maintain the ring shape.
- Prepare for Baking: Spray the edges of the tortillas with cooking spray or lightly brush with oil to promote crispiness while baking.
- Bake: Bake the quesadilla ring on the middle oven rack for 15-20 minutes until the cheese is melted, and the tortilla edges are golden and crispy.
- Garnish and Serve: Carefully transfer the baked ring to a serving platter. Optionally, garnish with the thinly sliced green onions for a fresh pop of color and flavor.
- Serve with Dips: Fill a small bowl with salsa and place it in the center of the quesadilla ring. Serve with additional bowls of sour cream and guacamole on the side for dipping. Enjoy your delicious and shareable blooming chicken quesadilla ring!
Notes
- Using room temperature cream cheese ensures the filling mixes smoothly.
- Feel free to use a combination of bell pepper colors for a visually appealing dish.
- Rotisserie chicken is a convenient shortcut, but homemade shredded chicken works just as well.
- Adjust taco seasoning according to your preferred spice level.
- Make sure not to overfill or over-roll tortillas to prevent the filling from spilling out during baking.
- Cooking spray or brushing with oil helps tortillas crisp up and prevents dryness.
- Serve immediately for best texture, as leftovers may lose crispness but are still tasty reheated.
