
If you’ve ever wished for a dessert that feels like a warm hug in a cup, then you’re about to fall head over heels for this Banana Pudding Cups Recipe. It’s the perfect blend of creamy vanilla pudding, fresh banana slices, and that irresistible crunch from vanilla wafers, all layered beautifully to create a sweet treat that’s both nostalgic and refreshing. Whether you’re whipping this up for a family gathering or craving a simple yet indulgent snack, these cups deliver comfort and flavor in every bite.
Ingredients You’ll Need
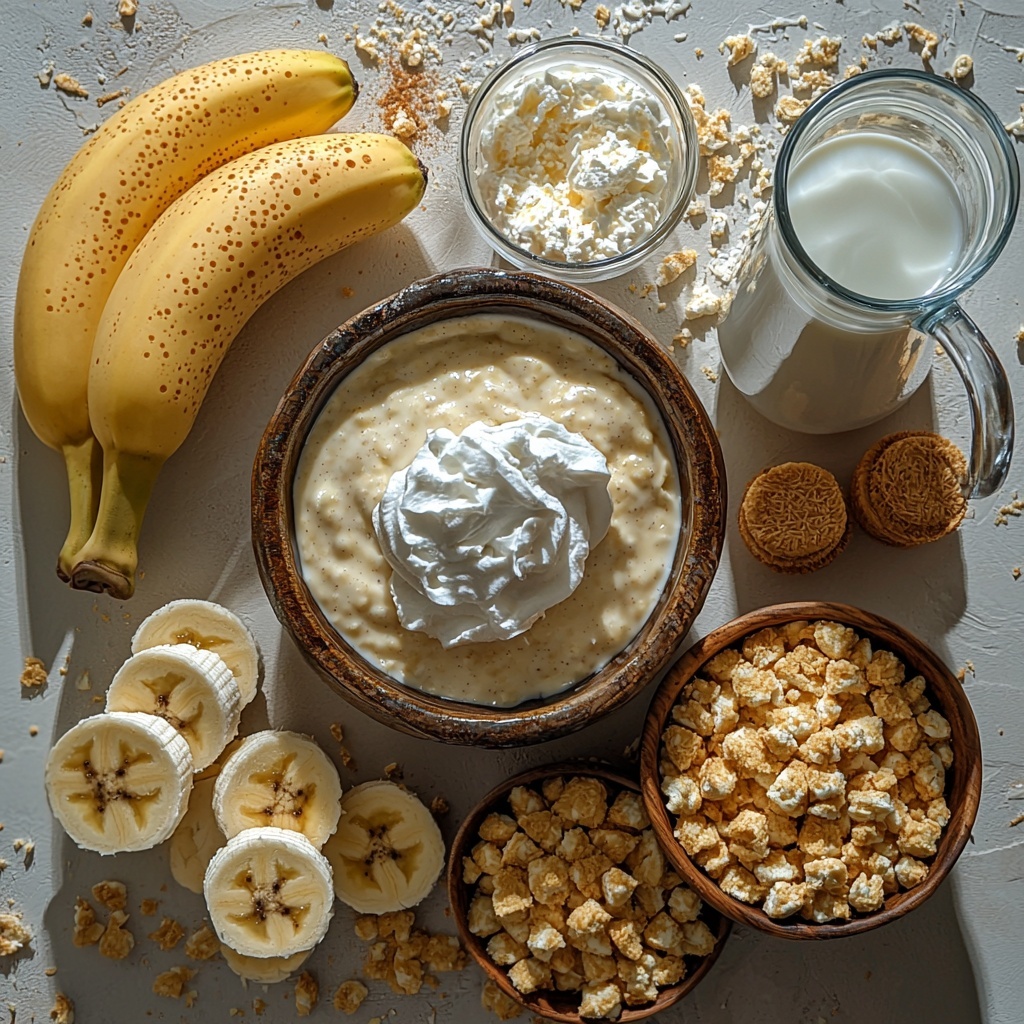
Getting started with this Banana Pudding Cups Recipe is a breeze because the ingredients are straightforward but each brings something special to the table. From the creamy pudding base to the fresh bananas and crunchy wafers, every element adds its own magic.
- 1 box (3.4 oz) instant vanilla pudding mix: The luscious foundation that sets the creamy tone.
- 2 cups cold milk: Essential for blending the pudding mix to silky smoothness.
- 1 cup whipped topping (e.g., Cool Whip): Adds lightness and fluffy texture to balance the richness.
- 2 ripe bananas, sliced: The star fruit that brings natural sweetness and a fresh burst of flavor.
- 1 cup crushed vanilla wafers (plus extra for garnish): Provides a delightful crunch that contrasts the creamy pudding.
- Whole vanilla wafers (for garnish): The charming finishing touch that makes each cup inviting.
How to Make Banana Pudding Cups Recipe
Step 1: Prepare the pudding
Start by whisking the instant vanilla pudding mix with the cold milk until it becomes smooth and lump-free. This step is key to getting that rich, velvety base. Once mixed, let it sit in the refrigerator for about 5 minutes so it sets perfectly.
Step 2: Fold in whipped topping
Once your pudding has chilled, gently fold in the whipped topping. This will give the dessert a fluffy, airy texture that’s light enough to balance the sweetness, creating a creamy consistency that’s downright irresistible.
Step 3: Assemble the cups
Now for the fun part – layering! In individual serving cups, start with a layer of crushed vanilla wafers. Add a layer of banana slices, and then spoon on the pudding mixture. Repeat these layers until the cups are filled, ensuring every bite has a perfect blend of flavors and textures.
Step 4: Top and garnish
Finish each cup with a generous dollop of whipped topping, sprinkle with more crushed vanilla wafers for extra crunch, and crown with a whole vanilla wafer. This final flourish not only looks stunning but adds an inviting aroma and texture.
Step 5: Chill to meld flavors
Pop your Banana Pudding Cups Recipe into the refrigerator for at least 30 minutes so all the delicious layers have a chance to come together. This rest time enhances every flavor, making each spoonful even more heavenly.
How to Serve Banana Pudding Cups Recipe
Garnishes
Beyond vanilla wafers, feel free to get creative with garnishes. A sprinkle of toasted coconut flakes, a drizzle of caramel sauce, or even a few mini chocolate chips can add delightful twists while keeping the focus on that classic banana pudding flavor.
Side Dishes
These Banana Pudding Cups are versatile enough to pair beautifully with light and fresh sides. Consider serving them alongside a crisp green salad or simple fruit salad to balance the dessert’s sweetness and round out your meal with freshness.
Creative Ways to Present
Instead of traditional cups, try mason jars or decorative glassware to layer your Banana Pudding Cups Recipe. This adds a charming, rustic touch that’s perfect for gatherings or gifting. You could even prepare mini parfait spoons for a finger-food version at parties.
Make Ahead and Storage
Storing Leftovers
If you find yourself with leftovers, no worries. Store your Banana Pudding Cups in airtight containers in the refrigerator, and they will remain fresh and delicious for 3 to 4 days. This timeframe ensures the bananas won’t turn overly mushy and the wafers retain some crunch.
Freezing
Freezing banana pudding cups is not recommended because the texture of the bananas and pudding changes and can become watery or grainy upon thawing. It’s best to enjoy this dessert fresh within a few days of making it.
Reheating
Since this is a chilled dessert, reheating is unnecessary and would alter the creamy texture you love. Simply enjoy cold straight from the fridge for the best flavor and consistency.
FAQs
Can I use fresh whipped cream instead of whipped topping?
Absolutely! Freshly whipped cream works wonderfully and can add an even richer, homemade feel to your Banana Pudding Cups Recipe. Just be sure to fold it in gently to keep that airy texture.
What’s the best type of bananas to use?
Choose ripe but firm bananas. Overripe bananas might turn your pudding soggy and overly sweet, while underripe ones can be too tart or tough. The perfect banana is yellow with just a few brown spots.
Can I make this recipe dairy-free?
Yes, by selecting a dairy-free pudding mix, plant-based milk like almond or oat milk, and a dairy-free whipped topping, you can create a delicious dairy-free version that keeps all the charm of this Banana Pudding Cups Recipe.
How long can I let the pudding set before adding whipped topping?
The pudding should chill for at least 5 minutes to set properly, but you can refrigerate it a bit longer if needed—just make sure it’s not too firm before folding in the whipped topping.
Can I prepare the Banana Pudding Cups Recipe completely ahead of time?
Yes, you can assemble the dessert a few hours in advance and refrigerate. Just add the garnishes right before serving to keep the wafers crisp and the presentation fresh!
Final Thoughts
This Banana Pudding Cups Recipe is pure joy in a cup, combining simple ingredients into a dessert that feels special every single time. If you’re looking for an easy, crowd-pleasing sweet treat that’s both nostalgic and delightful, give this recipe a try. Your friends and family will be asking for seconds before you know it!
Print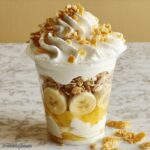
Banana Pudding Cups Recipe
- Prep Time: 10 minutes
- Cook Time: 0 minutes
- Total Time: 45 minutes
- Yield: 6 servings
- Category: Dessert
- Method: No-Cook
- Cuisine: American
Description
These Banana Pudding Cups are a quick and delightful no-bake dessert featuring layers of creamy vanilla pudding, ripe banana slices, and crunchy vanilla wafers. Perfect for a refreshing treat, they come together easily in just 45 minutes and make for a great individual serving dessert.
Ingredients
Pudding Mixture
- 1 box (3.4 oz) instant vanilla pudding mix
- 2 cups cold milk
- 1 cup whipped topping (e.g., Cool Whip)
Layering Ingredients
- 2 ripe bananas, sliced
- 1 cup crushed vanilla wafers (plus extra for garnish)
- Whole vanilla wafers (for garnish)
Instructions
- Prepare the pudding: In a medium bowl, whisk together the instant vanilla pudding mix and cold milk until the mixture is smooth and thickened. Refrigerate the pudding for 5 minutes to allow it to set properly.
- Fold in whipped topping: Gently fold the whipped topping into the chilled pudding mixture, combining it carefully to retain a creamy and fluffy texture without deflating the topping.
- Assemble the cups: In individual serving cups, create layers starting with a spoonful of crushed vanilla wafers, followed by sliced bananas, and then a layer of the pudding mixture. Repeat these layers until the cups are filled to the top.
- Top and garnish: Add a dollop of whipped topping on the top layer, sprinkle with additional crushed vanilla wafers, and finish by placing a whole vanilla wafer upright as a garnish.
- Chill: Refrigerate the assembled banana pudding cups for at least 30 minutes to let the flavors meld and the dessert to chill thoroughly before serving.
Notes
- Use ripe but firm bananas to prevent browning and maintain texture.
- For a healthier twist, substitute whipped topping with whipped coconut cream.
- Prepare the pudding cups a few hours ahead for best flavor integration.
- Keep the assembled cups covered while chilling to prevent the wafers from becoming too soggy.
- This dessert is best served within 24 hours for optimum freshness.

