Description
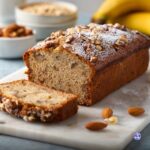
This Legendary Banana Nut Bread recipe delivers a soft, tender crumb and a moist, flavorful slice. Made with ripe bananas, toasted walnuts, and classic pantry staples, this easy-to-make banana bread offers bakery-quality results with minimal effort. A hint of cinnamon and optional yogurt or sour cream enrich the texture, making each slice incredibly satisfying for breakfast, snacks, or dessert.
Ingredients
Scale
Banana Nut Bread Ingredients
- 1 ½ cups mashed overripe bananas (about 3–4 medium bananas)
- ½ cup (113 g) unsalted butter, melted and cooled slightly
- ¾ cup (150 g) packed brown sugar
- 2 large eggs
- 2 teaspoons vanilla extract
- 1 ¾ cups (220 g) all-purpose flour
- 1 teaspoon baking soda
- ½ teaspoon fine salt
- 1 teaspoon ground cinnamon (optional)
- ¾ cup (90 g) chopped walnuts, plus extra for topping (optional)
- ¼ cup (60 g) plain yogurt or sour cream (optional)
Instructions
- Preheat and prep the pan: Preheat your oven to 350°F (175°C). Grease a 9×5-inch loaf pan and line it with parchment paper, leaving an overhang to easily lift the bread out after baking.
- Mash the bananas: In a large bowl, mash the overripe bananas until mostly smooth with a few small lumps remaining for added texture and flavor.
- Mix the wet ingredients: Whisk the melted butter, brown sugar, eggs, and vanilla extract together in the bowl with the mashed bananas until the mixture is glossy and well combined. If using, whisk in the plain yogurt or sour cream for extra tenderness.
- Combine the dry ingredients: In a separate bowl, whisk together the all-purpose flour, baking soda, salt, and ground cinnamon if using. This ensures even rising and flavor distribution.
- Mix wet and dry ingredients: Gently fold the dry ingredients into the wet mixture with a spatula just until no streaks of flour remain. Be careful not to overmix to keep the bread tender and soft.
- Fold in the walnuts: Gently fold in the chopped walnuts, reserving a small handful to sprinkle on top of the batter if desired for a bakery-style finish.
- Bake: Pour the batter into the prepared loaf pan and smooth the top. Sprinkle the reserved walnuts on top if using. Bake for 55 to 65 minutes, or until the center is set. If the top browns too quickly, loosely cover the pan with foil for the last 15 to 20 minutes of baking.
- Check for doneness: Insert a toothpick into the center of the bread. It should come out with a few moist crumbs, but no wet batter. The center should feel springy and should not wobble when you nudge the pan gently.
- Cool: Allow the bread to cool in the pan for 10 to 15 minutes. Then, lift it out using the parchment overhang and transfer to a wire rack. Let cool completely for 45 to 60 minutes before slicing to ensure a clean, soft crumb.
- Serve: Once fully cooled, slice the banana nut bread and enjoy. Try to resist sampling too many slices straight away to allow the flavors to fully set.
Notes
- Use very ripe bananas with lots of brown spots for the sweetest, most flavorful bread.
- Toasting the walnuts for 5–7 minutes intensifies their nutty flavor and adds a delightful crunch.
- You can substitute melted butter with a neutral oil, but butter provides richer flavor.
- Spoon and level the flour or weigh it to avoid a dry loaf from too much flour.
- Adding yogurt or sour cream keeps the bread extra moist and tender, especially if bananas are not very juicy.
- Cover with foil partway through baking if the top browns too fast to prevent burning.
- Allow the bread to cool completely before slicing for the best texture and clean cuts.