
“`html
If you love the irresistible crunch of a Twix bar but have been looking for a way to enjoy it guilt-free and completely plant-based, this Vegan Twix Ice Cream Recipe is going to become your new obsession. Combining creamy oat-based ice cream with a buttery vegan cookie crust, a luscious caramel center, and a smooth chocolate coating, it’s an indulgent treat that feels like pure magic with each bite. Perfect for warm days or any time you crave a decadent dessert made with wholesome, simple ingredients, this recipe is designed to delight your taste buds and your conscious heart.
Ingredients You’ll Need
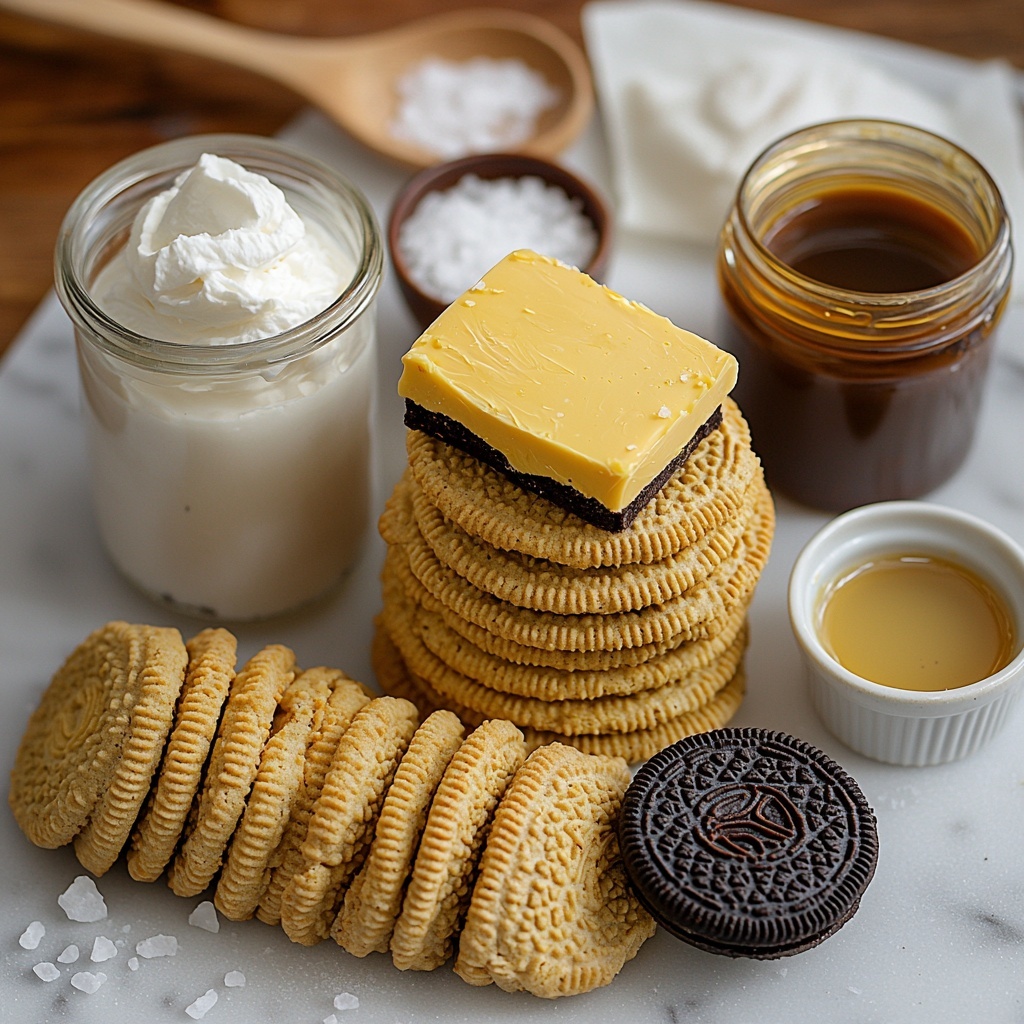
The beauty of this Vegan Twix Ice Cream Recipe lies in its straightforward yet carefully chosen ingredients. Each component plays an essential role in creating the perfect harmony of flavors and textures — from the crunchy golden Oreos that form the base to the silky caramel that nestles in the center. These pantry staples come together effortlessly to deliver authentic Twix vibes without any compromises.
- 100 g golden Oreos (or other vegan cookies): Provides a sweet, crunchy foundation with classic cookie flavor.
- 25 g unsalted vegan butter (block-style): Helps bind the cookie crust and adds richness.
- ¼ teaspoon sea salt: Balances sweetness and enhances overall flavor depth.
- 400 ml oat whipping cream: Creates a creamy, luscious texture for the ice cream.
- 250 g sweetened condensed oat milk: Adds natural sweetness and a smooth consistency.
- 1 teaspoon vanilla bean paste (or vanilla extract): Brings warming, aromatic notes to the ice cream base.
- 150 g vegan caramel: The star element that mimics the signature Twix center with sweet, buttery goodness.
- 1 tablespoon coconut oil (optional): Helps the chocolate coating set smoothly and adds a subtle tropical flair.
How to Make Vegan Twix Ice Cream Recipe
Step 1: Prepare Your Pan and Ingredients
Start by lining a 9-inch loaf pan with parchment paper on the base and sides. This step is crucial to ensure your ice cream bars pop out easily when it’s time to serve. Take a moment to gather all your ingredients and equipment, so you’re fully ready before diving into this fun process.
Step 2: Make the Cookie Crust
Pop the golden Oreos, sea salt, and vegan butter into a food processor and blitz them until the mixture sticks together when pressed between your fingers. This crumbly yet cohesive crust will form the foundation of your ice cream bars and give them that signature crunch.
Step 3: Press and Chill the Crust
Firmly press the cookie crumb mixture into the bottom of the prepared pan using your fingers or the back of a spoon. Compacting it well is key for a sturdy base that holds up against the luscious filling. Pop it into the fridge and let it chill while you prepare the creamy ice cream filling.
Step 4: Whip Up the Ice Cream Filling
Whisk the oat whipping cream in a stand mixer or with a hand whisk until it’s silky and smooth. Next, add the sweetened condensed oat milk and vanilla bean paste, whisking again to blend everything perfectly. This creates a velvety base that’s irresistibly creamy and sweet.
Step 5: Pour Filling and Freeze
Pour your whipped filling over the chilled crust, smoothing it out gently. Transfer the pan to the freezer and let it harden for at least 4 hours, or overnight if you want to prepare ahead and take your time with the next steps.
Step 6: Scoop Wells for Caramel
Once the ice cream is frozen solid, let it sit at room temperature for about 10 minutes to soften slightly. Using a half-teaspoon or melon baller, carefully scoop out seven small wells in the ice cream, taking care not to break through the bottom crust or leave bars too close together. These indentations will hold your luscious caramel filling.
Step 7: Fill Wells with Vegan Caramel
Fill a piping bag with the vegan caramel and gently pipe it into each well. Be cautious to avoid overfilling so the caramel stays neatly contained. Return the pan to the freezer and let it chill for at least another hour so the caramel sets beautifully.
Step 8: Slice into Bars
Using a sharp knife, carefully cut the ice cream into seven bars, each featuring a delicious well of caramel in the center. Place these bars on a parchment-lined tray and pop them back into the freezer until you’re ready to coat them with chocolate.
Step 9: Coat with Chocolate
Melt your choice of chocolate along with coconut oil over a double boiler, stirring until smooth and glossy. Quickly dip each frozen ice cream bar into the melted chocolate using a fork and spoon, then transfer back onto parchment paper. Sprinkle a little sea salt on top to enhance the flavor and freeze the bars again for 15 minutes, letting the chocolate harden perfectly.
How to Serve Vegan Twix Ice Cream Recipe
Garnishes
Sprinkle a pinch of flaky sea salt on your bars just before serving to balance the sweetness and highlight the chocolate’s richness. For an extra touch, crushed vegan cookies or a drizzle of caramel sauce can make your presentation even more irresistible.
Side Dishes
This Vegan Twix Ice Cream Recipe shines wonderfully on its own but also pairs beautifully with fresh berries or a simple coconut cream whipped topping for a refreshing contrast. A cup of rich almond coffee or a bright citrus salad can complement the indulgence for a perfectly rounded dessert experience.
Creative Ways to Present
Get playful by arranging individual bars on a dessert platter alongside small bowls of vegan caramel, melted chocolate, or crushed nuts. Layered in parfait glasses with crushed cookies and caramel drizzle creates an elegant, deconstructed spin on the classic bars. Hosting a summer party? Serve them on sticks for vegan ice cream Twix pops everybody will adore.
Make Ahead and Storage
Storing Leftovers
Keep any extra bars in an airtight container in the freezer for up to one month. To prevent them from sticking together, wrap each bar individually in parchment paper before tucking them in the container. This method also helps preserve their shape and texture beautifully.
Freezing
You can prepare the entire Vegan Twix Ice Cream Recipe well in advance and freeze it for up to a month, making it a perfect make-ahead treat for special occasions. Just be sure everything is tightly wrapped or stored to avoid freezer burn and maintain the freshest flavor.
Reheating
Since this recipe is an ice cream treat, reheating is not recommended. However, allowing bars to soften at room temperature for about 5-10 minutes before serving ensures they are perfectly creamy and easy to bite into without melting too quickly.
FAQs
Can I use other types of vegan cookies instead of golden Oreos?
Absolutely! While golden Oreos give a sweet, familiar flavor and a light color contrast, any vegan cookie that crumbles well can work for the crust. Just be sure the cookies you choose are sturdy enough to hold together once combined with vegan butter.
Is there a substitute for oat whipping cream?
You can try other plant-based whipping creams like soy or coconut whipping cream depending on your taste preference and dietary needs. Keep in mind that oat whipping cream offers a neutral flavor and creamy texture that complements the other ingredients beautifully.
What can I use instead of vegan caramel?
If you prefer, you can make your own vegan caramel using coconut milk and brown sugar or look for other store-bought vegan caramel sauces. Just ensure it’s thick enough to hold in the wells without running over the edges.
How do I prevent the chocolate coating from cracking?
Adding a tablespoon of coconut oil to the melted chocolate helps achieve a smooth, shiny finish that sets well without cracking. Also, dipping the bars while they’re very cold and allowing them to fully harden in the freezer helps maintain that perfect coating.
Can I make this recipe nut-free?
Yes! This Vegan Twix Ice Cream Recipe is naturally nut-free as long as you choose vegan butter and chocolate that are free of nuts. Always double-check ingredient labels if allergy safety is a concern.
Final Thoughts
This Vegan Twix Ice Cream Recipe is a joyous celebration of textures and flavors that channel the nostalgic charm of a classic candy bar without any animal products. Whether you’re sharing it with friends, indulging solo, or surprising loved ones with a thoughtful homemade dessert, it’s sure to bring smiles and happy sighs. Give this recipe a go — your freezer and your taste buds will thank you!
“`
Print
Vegan Twix Ice Cream Recipe
- Prep Time: 20 minutes
- Cook Time: 0 minutes
- Total Time: 5 hours 40 minutes (including freezing time)
- Yield: 7 bars
- Category: Dessert
- Method: Freezing
- Cuisine: Vegan
- Diet: Vegan
Description
This Vegan Twix Ice Cream is a decadent homemade dessert featuring a crunchy cookie crust, creamy oat-based ice cream filling, and a luscious caramel center, all coated in rich chocolate. Perfect for a vegan-friendly treat that satisfies sweet cravings without dairy.
Ingredients
Crust
- 100 g golden Oreos (or other vegan cookies)
- 25 g unsalted vegan butter (block-style)
- ¼ teaspoon sea salt
Ice Cream Filling
- 400 ml oat whipping cream
- 250 g sweetened condensed oat milk
- 1 teaspoon vanilla bean paste (or vanilla extract)
Caramel & Coating
- 150 g vegan caramel
- 1 tablespoon coconut oil (optional)
- Vegan chocolate (amount sufficient to coat bars, estimated 150-200 g)
- Sea salt for sprinkling
Instructions
- Prepare: Line the base and sides of a 9″ loaf pan with parchment paper. Read all instructions carefully to ensure all ingredients and equipment are ready. Refer to any step-by-step images if available.
- Make the crust: Place the cookies, sea salt, and vegan butter into a food processor and blitz until the mixture sticks together when pressed between your fingers.
- Form the crust: Press the crust mixture firmly into the base of the lined loaf pan, smoothing it evenly with your fingers or a spoon. Refrigerate while preparing the filling.
- Make the filling: Whisk the oat whipping cream in a stand mixer or by hand until smooth and slightly thickened. Add the sweetened condensed oat milk and vanilla bean paste, whisking again to combine fully. Pour this filling over the chilled crust in the pan.
- Freeze the ice cream: Place the pan in the freezer for at least 4 hours or overnight until fully set.
- Prepare wells for caramel: Remove from freezer and let sit at room temperature for 10 minutes to soften slightly. Using a half-teaspoon measure or small melon baller, scoop out 7 wells in the ice cream, about ½ cm from the pan edges and spaced apart for slicing later.
- Add caramel: Transfer the vegan caramel to a piping bag and carefully fill each well without overfilling. Return the pan to the freezer for at least 1 hour to firm up.
- Slice into bars: Use a sharp knife to carefully cut the frozen ice cream into 7 rectangular bars, each with a caramel center. Place the bars on a parchment-lined tray and freeze until ready for coating.
- Coat bars: Melt vegan chocolate and coconut oil together over a double boiler until smooth. Pour melted chocolate into a shallow bowl. Dip each bar using a fork and spoon to coat completely, then transfer to parchment paper. Sprinkle with sea salt and freeze for 15 minutes to set the coating.
- Store: Keep the coated bars in an airtight container in the freezer for up to one month. For best quality, wrap each bar individually in parchment paper before storing.
Notes
- Use golden Oreos or similar vegan cookies to ensure the crust is vegan-friendly.
- Oat whipping cream and condensed oat milk provide a creamy texture without dairy.
- Optionally, coconut oil in the chocolate coating helps with a smooth, glossy finish and easier setting.
- Allow the ice cream to soften slightly before scooping wells to avoid cracking.
- Individual wrapping prevents bars from sticking together during storage.


