
“`html
If you have been searching for the ultimate comfort food that combines rich, velvety cheese with perfectly tender pasta, you have just found it—this Ultimate Creamy Baked Mac and Cheese Recipe is nothing short of a masterpiece. Every bite delivers that warm, gooey, cheesy goodness that feels like a big, cozy hug on a plate, making it the perfect dish to satisfy cravings or impress your loved ones at any gathering.
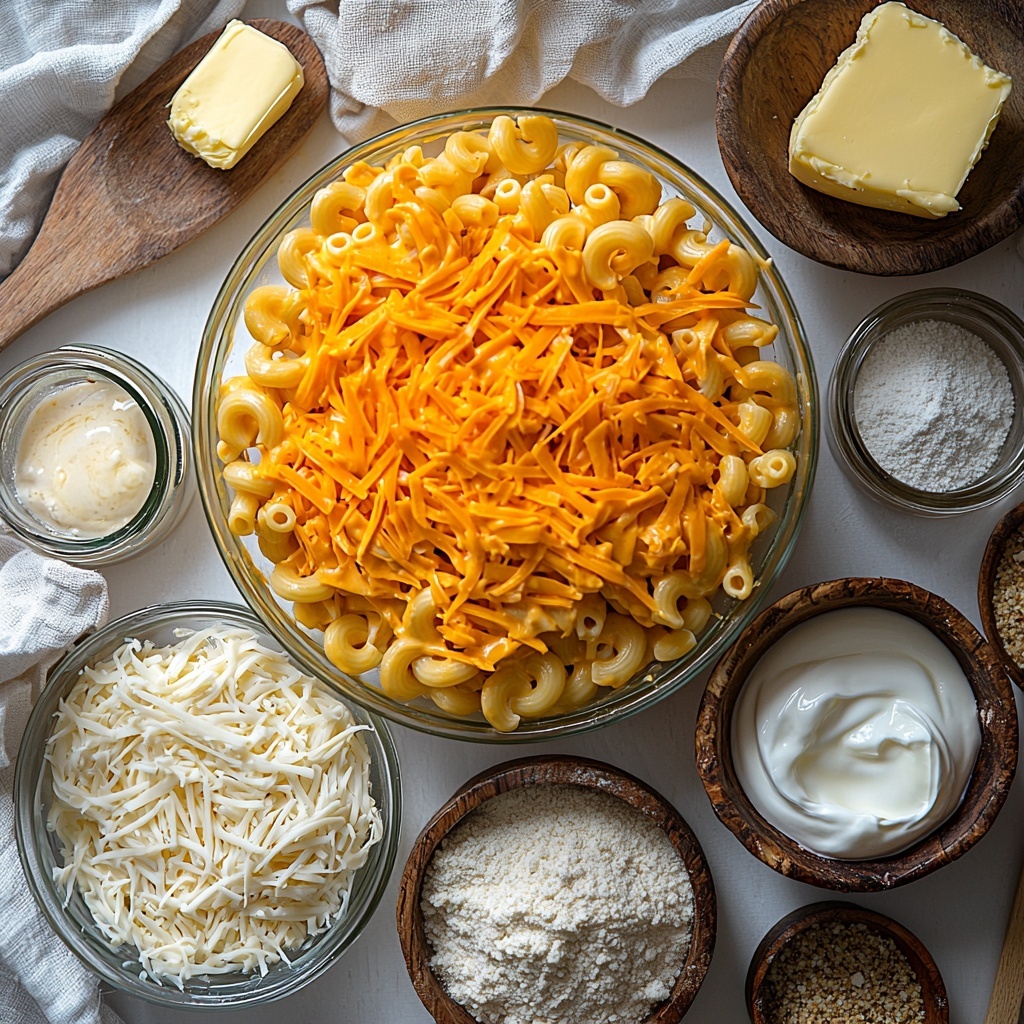
Ingredients You’ll Need
This recipe relies on a handful of simple yet essential ingredients, each playing a crucial role in creating that silky-smooth texture, deep cheesy flavor, and satisfying crust that make Ultimate Creamy Baked Mac and Cheese Recipe so crave-worthy.
- 1 lb elbow macaroni: Classic pasta shape that perfectly holds the rich cheese sauce.
- 2 cups shredded sharp cheddar cheese: Offers bold, tangy flavor with excellent meltability.
- 1/2 cup shredded mozzarella cheese: Adds stretchiness and milder creaminess to balance the cheddar.
- 3 cups heavy cream: Creates the indulgent, silky base for the sauce.
- 1/4 cup butter: Essential for a rich roux that thickens the sauce and adds flavor.
- 1/4 cup all-purpose flour: Combines with butter to make a roux that gives the sauce its creamy body.
- 1 teaspoon garlic powder: Provides a subtle depth and savory note.
- 1 teaspoon onion powder: Enhances the overall flavor complexity with gentle sweetness.
- 1/2 teaspoon salt: Balances and brings all flavors together beautifully.
- 1/4 teaspoon black pepper: Adds a delicate hint of warmth without overpowering.
- 1/2 cup breadcrumbs (optional): For a golden, crispy topping that adds texture contrast.
How to Make Ultimate Creamy Baked Mac and Cheese Recipe
Step 1: Prepare Your Oven and Pasta
First things first, preheat your oven to 350°F (175°C) and grease a 9×13-inch baking dish. This ensures your cheesy masterpiece won’t stick and lets you get that beautiful golden crust later. Meanwhile, cook the elbow macaroni according to the package instructions until just tender—al dente is best so it holds up after baking. Drain well and set aside, ready to soak up all that creamy sauce.
Step 2: Create the Roux for the Sauce
In a large saucepan, melt the butter over medium heat. Once melted, whisk in the flour and cook for 1 to 2 minutes. This step is crucial because it creates a roux, the base that will thicken your creamy sauce without any lumps. Keep stirring—it should bubble lightly and develop a subtle nuttiness, which adds a rich undertone to the final dish.
Step 3: Build the Creamy Cheese Sauce
Slowly pour in the heavy cream while whisking continuously. This patient stirring helps the sauce thicken evenly and become luxuriously smooth. Then, stir in garlic powder, onion powder, salt, and black pepper to infuse the sauce with subtle layers of flavor. Last but not least, add the shredded sharp cheddar and mozzarella cheeses, mixing until the sauce is melted, smooth, and irresistibly creamy.
Step 4: Combine Pasta and Cheese, Then Bake
Fold the cooked elbow macaroni into the luscious cheese sauce, ensuring every piece is generously coated. Pour this mixture into the prepared baking dish. If you love a crispy, golden topping, sprinkle the optional breadcrumbs evenly on top. Bake the whole dish for 20 to 25 minutes until it’s bubbling joyfully and the topping is perfectly golden. Remove from the oven and get ready to enjoy pure comfort!
How to Serve Ultimate Creamy Baked Mac and Cheese Recipe
Garnishes
Add a sprinkle of freshly chopped parsley or chives for a pop of color and a bright herbal note that contrasts beautifully with the creamy richness. A light dusting of smoked paprika or a pinch of crispy bacon bits can also elevate the dish with added flavor and texture.
Side Dishes
To round out this satisfying meal, pair your Ultimate Creamy Baked Mac and Cheese Recipe with something fresh and vibrant like a crisp green salad dressed lightly with lemon vinaigrette. Steamed seasonal veggies like broccoli or green beans offer a nice crunch and a healthy balance to the richness. For a heartier meal, roasted chicken or grilled sausages complement the baked mac and cheese wonderfully.
Creative Ways to Present
Serve the mac and cheese in individual ramekins for an elegant touch, perfect for dinner parties. You can also elevate presentation by topping each portion with different garnishes or mixing in add-ins like cooked bacon, caramelized onions, or roasted garlic for an exciting twist on this Ultimate Creamy Baked Mac and Cheese Recipe.
Make Ahead and Storage
Storing Leftovers
Once cooled, transfer leftovers to an airtight container and store in the refrigerator. For best quality and texture, enjoy within 3 to 4 days. The flavors meld beautifully after resting, so reheating is just as delightful as fresh.
Freezing
You can freeze portions of your mac and cheese for up to 2 months. Place it in freezer-safe containers or bags, making sure to cool completely before freezing. Thaw overnight in the refrigerator before reheating to maintain the creamy texture and cheesy goodness.
Reheating
To reheat, warm your mac and cheese in the oven at 350°F (175°C) for about 20 minutes, or until heated through and bubbly. If reheating individual portions, the microwave works well—cover the dish loosely and stir halfway through to ensure even heating. Adding a splash of cream or milk can help refresh the creamy texture.
FAQs
Can I use different types of cheese?
Absolutely! While sharp cheddar and mozzarella create the perfect balance in this Ultimate Creamy Baked Mac and Cheese Recipe, feel free to experiment with cheeses like Gruyère, Monterey Jack, or Fontina to tailor it to your taste.
Is it necessary to use breadcrumbs on top?
Breadcrumbs add a lovely crunchy topping but are completely optional. If you prefer a softer top or want to keep it gluten-free, simply skip this step and enjoy the dish as is.
Can I make this recipe dairy-free?
To keep the same creamy texture without dairy, substitute heavy cream with plant-based cream alternatives and use dairy-free cheese substitutes. Keep in mind the flavor and texture may vary but it still makes a delicious comfort meal.
How do I prevent the mac and cheese from becoming watery when reheated?
Ensure the pasta is cooked al dente before baking and let the sauce thicken properly before combining. When reheating, avoid overheating too quickly and add a little cream or milk if it seems dry to restore creaminess.
Can I add protein to this recipe?
Yes! Stirring in cooked chicken, crispy bacon, or even sautéed mushrooms before baking adds heartiness and makes the dish more filling without losing that signature creaminess.
Final Thoughts
This Ultimate Creamy Baked Mac and Cheese Recipe is truly a crowd-pleaser that brings comfort, flavor, and a bit of nostalgia with every forkful. Whether you make it for family dinners, potlucks, or whenever your soul needs a cheesy boost, it never disappoints. Give it a try and watch it quickly become one of your all-time favorite ways to enjoy mac and cheese!
“`
Print
Ultimate Creamy Baked Mac and Cheese Recipe
- Prep Time: 15 minutes
- Cook Time: 25 minutes
- Total Time: 40 minutes
- Yield: 6 servings
- Category: Main Course
- Method: Baking
- Cuisine: American
Description
This Ultimate Creamy Baked Mac and Cheese recipe features a rich and velvety cheese sauce made from sharp cheddar and mozzarella cheeses, combined with tender elbow macaroni and baked to golden perfection with an optional crispy breadcrumb topping. Perfect for a comforting family dinner or special occasion side dish.
Ingredients
Pasta
- 1 lb elbow macaroni
Cheese Sauce
- 2 cups shredded sharp cheddar cheese
- 1/2 cup shredded mozzarella cheese
- 3 cups heavy cream
- 1/4 cup butter
- 1/4 cup all-purpose flour
- 1 teaspoon garlic powder
- 1 teaspoon onion powder
- 1/2 teaspoon salt
- 1/4 teaspoon black pepper
Topping (Optional)
- 1/2 cup breadcrumbs
Instructions
- Preheat Oven and Prepare Dish: Preheat your oven to 350°F (175°C) and grease a 9×13-inch baking dish to prevent the mac and cheese from sticking.
- Cook Macaroni: Boil the elbow macaroni according to the package instructions until al dente. Drain well and set aside.
- Create Roux: In a large saucepan over medium heat, melt the butter. Add the all-purpose flour and cook, stirring constantly, for 1-2 minutes to form a roux, which will thicken the sauce.
- Add Cream: Slowly pour in the heavy cream while continuously stirring to avoid lumps. Continue stirring until the sauce thickens to a creamy consistency.
- Season Sauce: Mix in garlic powder, onion powder, salt, and black pepper to infuse the sauce with savory flavors.
- Melt Cheeses: Add the shredded sharp cheddar and mozzarella cheese to the sauce, stirring until both cheeses are completely melted and the sauce is smooth.
- Combine Pasta and Sauce: Stir the cooked macaroni into the cheese sauce until evenly coated. Pour the mixture into the prepared baking dish.
- Add Topping and Bake: Sprinkle breadcrumbs evenly over the top, if using, to create a crunchy crust. Bake in the preheated oven for 20-25 minutes, or until the top is golden brown and the mac and cheese is bubbly.
Notes
- You can substitute whole milk or half-and-half for heavy cream for a lighter dish, but the sauce will be less rich.
- For extra flavor, try adding a pinch of smoked paprika or mustard powder to the cheese sauce.
- If you prefer a crunchy topping but don’t have breadcrumbs, crushed crackers or cornflakes work well.
- Make sure to cook the macaroni just until al dente, as it will continue to cook in the oven and absorb sauce.
- Leftovers can be stored in an airtight container in the refrigerator for up to 3 days and reheated in the oven or microwave.


