“`html
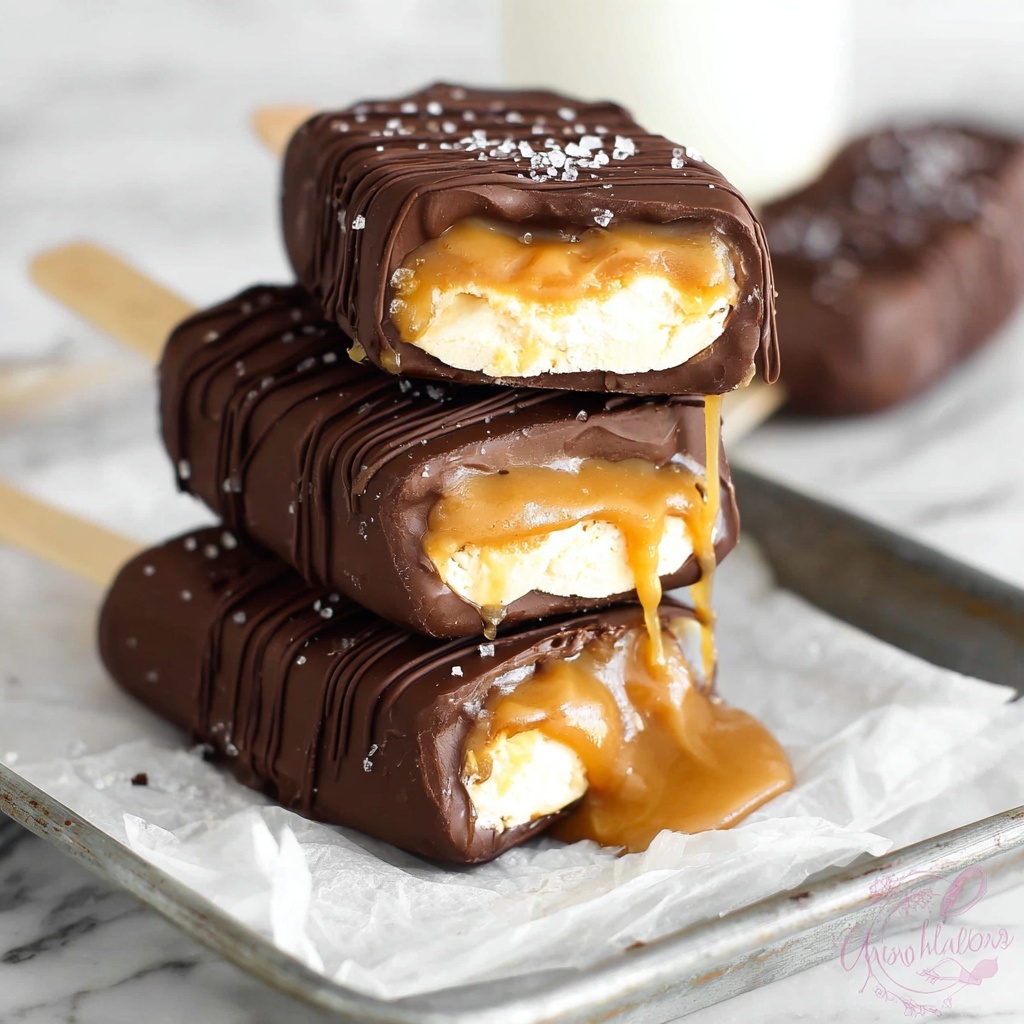
If you have a soft spot for rich, creamy treats that tantalize your taste buds with the perfect balance of sweet and salty, you are going to adore this Peanut Butter Ice Cream Bars Recipe. Imagine velvety, smooth peanut butter-infused ice cream encased in a luscious chocolate shell, with just a touch of sea salt to brighten every bite. It’s a dreamy dessert that feels indulgent but is surprisingly straightforward to make at home. Whether you’re a devoted peanut butter fan or simply craving an ice cream bar that feels homemade and luxe, this recipe is a total winner.
Ingredients You’ll Need
The magic of this Peanut Butter Ice Cream Bars Recipe is in its simple, thoughtful ingredients. Each one plays a crucial role, creating that irresistibly creamy texture and layered flavors that make these bars so special.
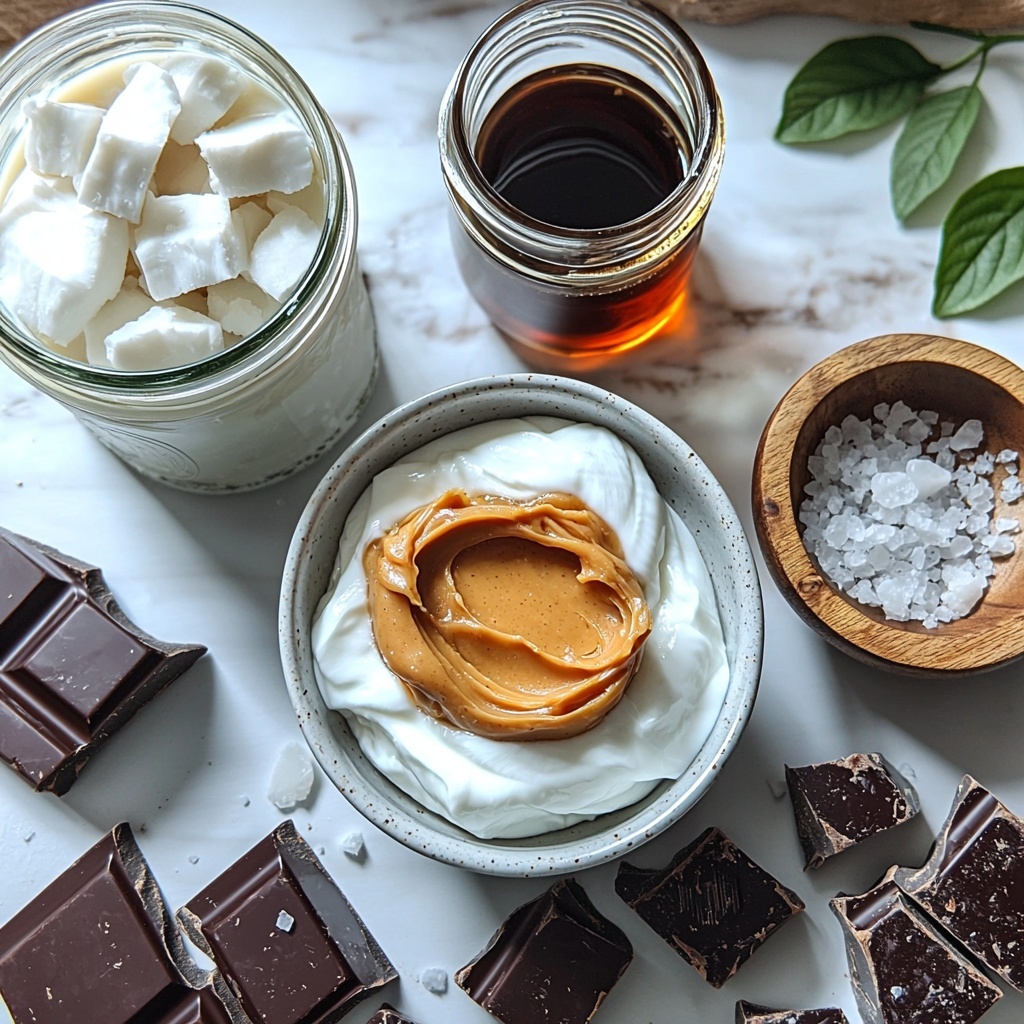
- 180 g chilled canned full-fat coconut milk: This ensures a rich, creamy base with natural smoothness and subtle coconut undertones.
- 100 g smooth peanut butter: Adds that classic nutty richness and creamy texture throughout the ice cream.
- 60 g vegan yogurt: Brings a touch of tang and creaminess, enhancing the overall mouthfeel without overpowering the peanut flavor.
- 60 ml pure maple syrup: A gentle natural sweetener that melds perfectly with the peanut butter’s savory notes.
- 100 g smooth peanut butter (for coating): Melted for a luscious, velvety coating that hugs the ice cream bars.
- 140 g dark chocolate: Melts into a shiny, bittersweet shell to provide textural contrast and deepen the flavor profile.
- Sea salt (to garnish): A sprinkle enhances the peanut butter’s flavor, giving a delightful salty-sweet balance.
How to Make Peanut Butter Ice Cream Bars Recipe
Step 1: Prepare the Ice Cream Base
Start by assembling all your ingredients and placing your ice cream molds on a freezer-safe tray—the tray helps keep everything stable as you work. Then, add the chilled coconut milk, smooth peanut butter, vegan yogurt, and pure maple syrup into a high-speed blender. Blend until the mixture is irresistibly smooth and creamy. Don’t be shy to scrape down the sides a couple of times; this ensures everything gets blended evenly and no peanut butter lumps sneak through.
Step 2: Fill the Molds
Once your ice cream mixture is perfectly smooth, transfer it to a piping bag for the neatest results. Pipe the creamy mixture straight into the molds. If you don’t have a piping bag, no worries—a spoon works fine too, just expect a bit more of a mess (but it’s totally worth it!). Slide a wooden lolly stick into each filled mold to form the classic ice cream bar handle.
Step 3: Freeze Until Firm
Pop the filled molds into the freezer for 4 to 6 hours so the ice cream bars can set fully. This time is essential for that perfect firm-yet-creamy texture. Once frozen solid, gently remove the bars from the molds. Return them to the freezer on a parchment-lined tray to keep them ready for the next stage.
Step 4: Prepare the Peanut Butter Coating
To create the luxurious coating, melt the second batch of peanut butter over a double boiler until it’s beautifully runny and perfect for dipping. Pour the melted peanut butter into a tall glass for easy dipping. One by one, dip each frozen ice cream bar into the peanut butter, coating it evenly, then set the bars back on the tray and freeze briefly for 10 minutes. This step seals in the creamy ice cream and adds a deliciously rich layer.
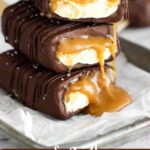
Step 5: Chocolate Shell and Finishing Touches
Now it’s time for the chocolate magic. Melt your dark chocolate over a double boiler until it’s silky smooth and glossy. Pour it into a separate tall glass for dipping. Dip each peanut butter-coated ice cream bar in chocolate, allowing it to cover the peanut butter layer fully. Place them back on the tray for a final 10-minute freeze while the chocolate sets. Finish with a drizzle of any leftover melted chocolate and a generous sprinkle of sea salt to elevate every bite.
How to Serve Peanut Butter Ice Cream Bars Recipe
Garnishes
Sprinkling a pinch of flaky sea salt on top after the chocolate sets is pure genius—it enhances flavors and adds just the right contrast. For extra flair, try a light scatter of crushed roasted peanuts or a drizzle of caramel sauce to boost texture and glam up your dessert plate.
Side Dishes
Pair these bars with fresh berries or a simple fruit salad to add brightness and balance the richness. A dollop of whipped coconut cream or a scoop of vanilla ice cream alongside can amplify the indulgence and make your dessert evening feel truly special.
Creative Ways to Present
Serve these bars on a rustic wooden board lined with parchment paper for an inviting, homemade vibe. For parties, individually wrap them in parchment or wax paper tied with twine to create adorable little treats everyone will want to grab. You can also stack a few on dessert plates with a sprinkle of edible flowers for a beautiful presentation that wows your guests.
Make Ahead and Storage
Storing Leftovers
If you’re lucky enough to have leftovers (they do tend to disappear fast!), store your Peanut Butter Ice Cream Bars in an airtight container with sheets of parchment paper between layers. Keep them in the freezer where they will stay fresh and delicious for up to 3 months, ready whenever you need a quick indulgence.
Freezing
The bars freeze wonderfully, so feel free to prepare a batch well ahead of time. Just make sure they’re properly set before coating and keep them stored in airtight conditions with parchment paper to avoid any unwanted freezer flavors or sticking.
Reheating
This is an ice cream treat, so reheating isn’t necessary—but let the bars sit at room temperature for about 5 minutes before serving if they feel too hard, to let them soften slightly and bring out all those creamy textures.
FAQs
Can I use crunchy peanut butter instead of smooth?
You can, but it might affect the creamy texture of the ice cream and coating. Smooth peanut butter creates the best silky consistency that blends well in the ice cream base and melts evenly for dipping.
Is this recipe vegan-friendly?
Yes! The use of full-fat coconut milk and vegan yogurt makes this Peanut Butter Ice Cream Bars Recipe completely vegan and perfect for plant-based diets.
What if I don’t have vegan yogurt?
You can substitute it with any plain plant-based yogurt you have. It adds creaminess and a slight tang, but if you skip it, the bars might be less creamy and a bit sweeter.
How do I prevent the chocolate from cracking when dipping?
Make sure the chocolate is properly melted and warm, but not too hot. Also, dip the bars quickly and set them back on a cool surface to let the chocolate harden nicely without cracking.
Can I use regular dairy milk instead of coconut milk?
This recipe is designed with coconut milk for creaminess and a hint of natural sweetness. Using regular dairy milk will change the texture and richness, so it’s best to stick with coconut milk for the optimal result.
Final Thoughts
This Peanut Butter Ice Cream Bars Recipe is truly a gem to have in your dessert repertoire. It’s simple, comforting, and utterly delicious—perfect for when you want to treat yourself or impress friends with a homemade sweet that feels like a luxury. Once you make these, they’ll become a go-to favorite, guaranteed to bring smiles on warm days or any day that calls for a special sweet escape.
“`
Print
Peanut Butter Ice Cream Bars Recipe
- Prep Time: 20 minutes
- Cook Time: 0 minutes
- Total Time: 6 hours 20 minutes
- Yield: 4 servings
- Category: Dessert
- Method: Blending
- Cuisine: Vegan
- Diet: Vegan
Description
Delight in these creamy, vegan Peanut Butter Ice Cream Bars, made with coconut milk, peanut butter, and vegan yogurt. Coated in peanut butter and rich dark chocolate with a sprinkle of sea salt, these homemade frozen treats are perfect for a refreshing indulgence anytime.
Ingredients
Ice Cream
- 180 g chilled canned full-fat coconut milk
- 100 g smooth peanut butter
- 60 g vegan yogurt
- 60 ml pure maple syrup
Coating
- 100 g smooth peanut butter
- 140 g dark chocolate
- Sea salt, to garnish
Instructions
- Prepare molds: Place the ice cream molds on a tray that fits into your freezer, ensuring stability for easier handling.
- Blend ice cream mixture: Add chilled coconut milk, smooth peanut butter, vegan yogurt, and pure maple syrup to a high-speed blender. Blitz until the mixture becomes smooth and creamy, scraping down the sides as needed to ensure even blending.
- Fill molds: Transfer the ice cream mixture into a piping bag and carefully pipe it into the molds. Alternatively, spoon the mixture in, though this may be messier. Insert a wooden lolly stick into each mold as a handle.
- Freeze until set: Place the molds in the freezer for 4 to 6 hours, or until the ice cream is completely frozen and firm.
- Unmold ice creams: Carefully remove the ice cream bars from their molds and place them on a parchment-lined tray. Return the tray to the freezer while preparing the coating.
- Melt peanut butter: In a heat-resistant bowl, melt the peanut butter over a double boiler until it becomes runny. Transfer the melted peanut butter to a tall glass for easy dipping.
- Coat with peanut butter: Dip each frozen ice cream bar into the melted peanut butter to coat evenly. Place the coated bars back on the tray and freeze for 10 minutes to set the coating.
- Melt chocolate: Melt the dark chocolate in a heat-resistant bowl over a double boiler until smooth. Transfer to a tall glass for dipping.
- Coat with chocolate: Dip each peanut butter-coated ice cream bar into the melted dark chocolate. Return the bars to the tray and chill in the freezer for another 10 minutes to set the chocolate coating.
- Garnish and serve: Drizzle any leftover melted chocolate over the bars and sprinkle with sea salt to enhance flavor. Serve immediately, or store the bars in an airtight container separated by parchment paper in the freezer for up to 3 months.
Notes
- Use full-fat canned coconut milk chilled for the creamiest texture.
- If you don’t have a high-speed blender, blend the mixture for longer to achieve smoothness.
- When melting peanut butter and chocolate, use gentle heat with a double boiler to avoid burning.
- Ensure ice cream bars are fully frozen before dipping to prevent melting.
- Store bars separated by parchment paper in an airtight container to avoid sticking.
