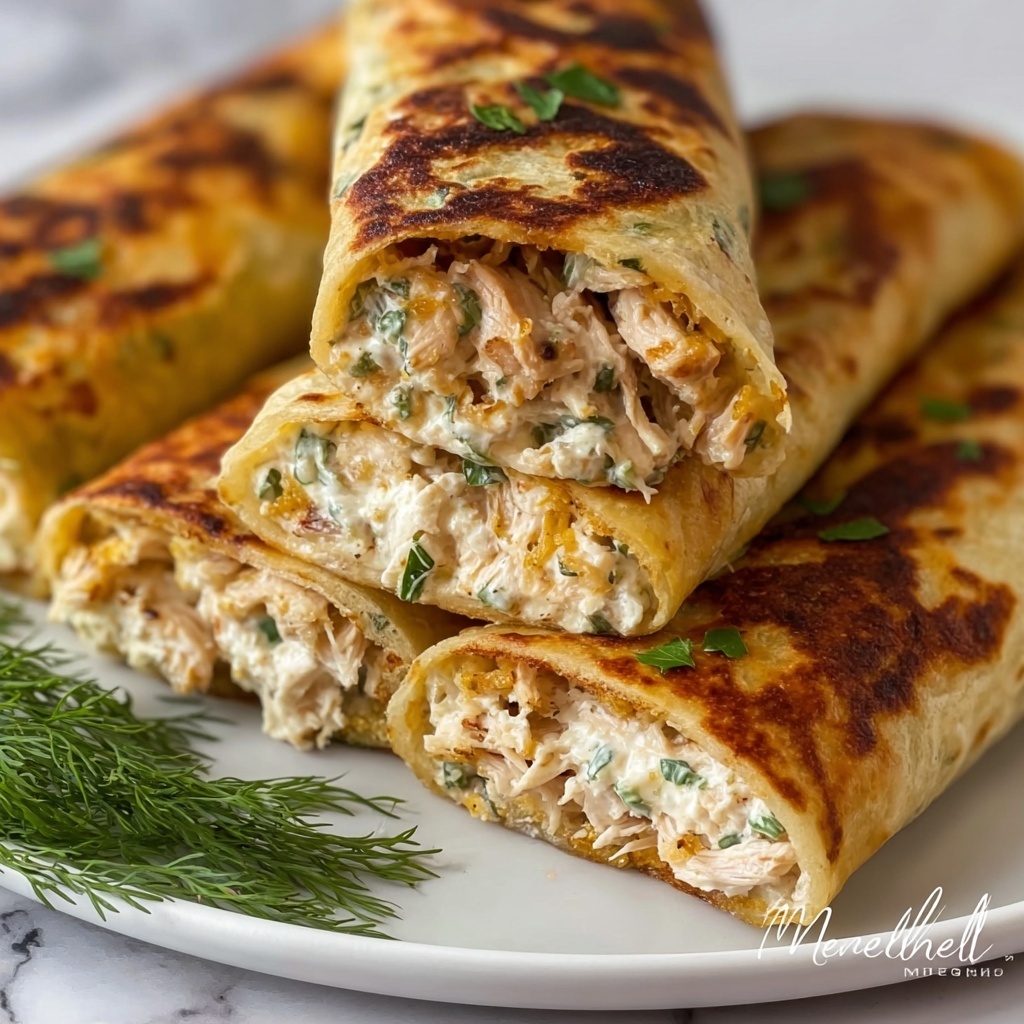
The Dill Pickle Ranch Chicken Taquitos Recipe is your new go-to finger food that perfectly balances tangy, creamy, and cheesy flavors with the irresistible crunch of baked tortillas. These taquitos bring a fresh twist to traditional chicken snacks by infusing each bite with the zesty kick of dill pickles and the comforting creaminess of ranch dressing. Whether you’re hosting a casual get-together or just craving an exciting dinner, this dish hits all the right notes without any fuss.
Ingredients You’ll Need
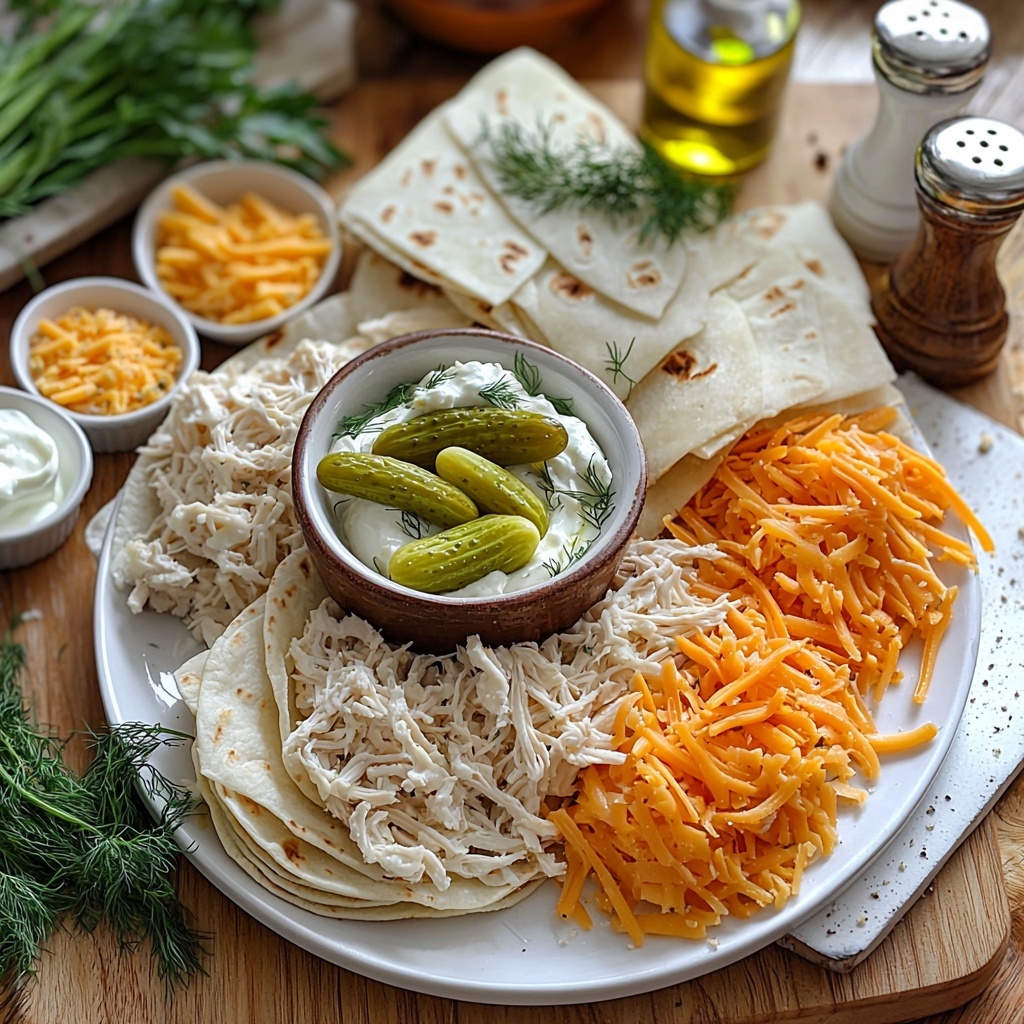
These simple ingredients come together to create a harmonious blend of flavors, textures, and colors that make these taquitos truly shine. Each component plays an essential role, from adding creaminess with cream cheese to the savory tang of dill pickles.
- 2 cups cooked chicken breast, shredded: The protein-packed base that soaks up all the delicious flavors.
- 1/2 cup dill pickles, finely chopped: Adds a bright, tangy crunch that’s the star of the show.
- 4 ounces cream cheese, softened: Brings creamy richness and helps bind the filling together.
- 1/3 cup ranch dressing: Infuses the filling with herby, savory goodness.
- 1/2 cup shredded cheddar cheese: Adds sharp, melty flavor and a delightful bite.
- 1/2 cup shredded mozzarella cheese: Gives stretch and gooey texture to every taquito.
- 2 tablespoons fresh dill, chopped: Brings a fresh, herbal note that elevates the pickle flavor.
- 1/2 teaspoon garlic powder: Adds subtle depth and warmth.
- 1/2 teaspoon onion powder: Enhances the savoriness without overpowering.
- Salt & black pepper, to taste: Balances all the flavors perfectly.
- 12 small flour tortillas (6-inch diameter): The perfect size and texture for rolling and crisping.
- Olive oil spray: Used to achieve that golden, crispy exterior without the mess of frying.
- Extra ranch dressing, for dipping: Because everything tastes better with more ranch.
- Chopped fresh dill & sliced pickles, for garnish: Adds a beautiful finishing touch and extra flavor.
How to Make Dill Pickle Ranch Chicken Taquitos Recipe
Step 1: Preheat and Prepare
Start by preheating your oven to 425°F (220°C). Line a baking sheet with parchment paper—this will keep the taquitos from sticking and make cleanup a breeze. Having the oven ready and your baking space prepped is key to getting that perfect crisp.
Step 2: Mix the Filling
In a large bowl, combine the shredded chicken, finely chopped dill pickles, softened cream cheese, ranch dressing, shredded cheddar and mozzarella cheeses, fresh dill, garlic powder, onion powder, salt, and black pepper. Mix everything thoroughly until you have a creamy, cheesy, and herby filling. This step is where all the deliciousness starts to come together, so make sure every bite is packed with flavor.
Step 3: Roll the Taquitos
Lay your small tortillas flat on a clean surface. Scoop about 3 tablespoons of the chicken mixture along the bottom third of each tortilla. Roll each tortilla up tightly around the filling to form your taquitos. Rolling tight helps keep the filling intact during baking and ensures every bite has that perfect crisp to soft ratio you crave.
Step 4: Arrange and Spray
Place the rolled taquitos seam-side down on the prepared baking sheet. This is important to keep them from unrolling while baking. Lightly spray the tops with olive oil spray; this small touch will help the taquitos develop a gorgeous golden-brown crust without needing to fry.
Step 5: Bake to Perfection
Bake the taquitos for 22 to 25 minutes until they’re golden and crispy. Keep an eye on them towards the end—everyone’s oven is a little different, but you want them crunchy on the outside while the cheese inside is melted and gooey.
Step 6: Cool and Serve
Once baked, let the taquitos cool for a few minutes to firm up. Serve with extra ranch dressing for dipping, and sprinkle chopped fresh dill and sliced pickles on top for the prettiest presentation and that extra burst of flavor.
How to Serve Dill Pickle Ranch Chicken Taquitos Recipe
Garnishes
Fresh dill and sliced pickles make the perfect garnish, echoing the flavors inside while adding bright color and texture. Don’t forget a generous side of ranch dressing for dipping—the creaminess complements the tangy, crispy taquitos brilliantly.
Side Dishes
Keep your meal balanced by serving these taquitos alongside a crisp green salad or some fresh-cut veggies. A bowl of homemade guacamole or a light corn salsa can add freshness and a pop of complementary flavors without overpowering your main star.
Creative Ways to Present
For parties, line these taquitos on a platter with small bowls of various dips like chipotle mayo, salsa, or even a honey mustard. To make them more of a hearty meal, serve them over a bed of shredded lettuce with a drizzle of ranch and extra pickles scattered around for a beautiful, rustic look.
Make Ahead and Storage
Storing Leftovers
Store any leftover taquitos in an airtight container in the refrigerator for 3 to 4 days. They maintain their flavor and texture beautifully when properly covered, making them ideal for quick lunches or snacks later in the week.
Freezing
You can freeze unbaked taquitos by placing them on a baking sheet lined with parchment and freezing them individually until firm. Then transfer to a freezer-safe bag or container. They’ll keep well for up to 2 months. When ready to enjoy, bake directly from frozen, adding a few extra minutes to the cooking time.
Reheating
To reheat leftover taquitos, place them on a baking sheet and bake at 375°F (190°C) for 10 to 12 minutes until warmed through and crispy again. Avoid microwaving if you want to retain that perfect crunch.
FAQs
Can I use a different type of cheese for this recipe?
Absolutely! While cheddar and mozzarella are perfect for melt and flavor, you can try Monterey Jack for a milder taste or pepper jack for a spicy twist. Just be sure to stick to cheeses that melt well to keep that creamy texture.
What if I don’t have fresh dill on hand?
Dried dill can work in a pinch—use about one-third the amount since it’s more concentrated. However, fresh dill truly brightens the flavor profile and is worth seeking out if possible.
Can these taquitos be made gluten-free?
Yes! Substitute the small flour tortillas with gluten-free tortillas available at most grocery stores. The baking time and temperature remain the same, and you won’t lose any of the deliciousness.
Is it possible to air fry these taquitos instead of baking?
Definitely! Air frying at 400°F (200°C) for 8-10 minutes works wonderfully to get a crispy exterior without the oven. Just place them seam side down and check for doneness as air fryers can vary.
How spicy are these taquitos? Can I make them milder or spicier?
This recipe is mild and creamy with no heat, perfect for all palates. To spice things up, try adding a dash of cayenne or chopped jalapeños to the filling. To keep it mild, simply leave out any spicy additions.
Final Thoughts
This Dill Pickle Ranch Chicken Taquitos Recipe is such a fun, flavorful twist that’s destined to become a family favorite. It brings together bold pickly brightness and cozy cheesy goodness in a crunchy baked package that’s perfect for any occasion. Trust me, once you’ve tried these, you’ll find yourself reaching for them again and again—so roll up your sleeves and dive into some seriously tasty taquito magic!
Print
Dill Pickle Ranch Chicken Taquitos Recipe
- Prep Time: 10 minutes
- Cook Time: 25 minutes
- Total Time: 35 minutes
- Yield: 12 taquitos (serves 12)
- Category: Appetizer
- Method: Baking
- Cuisine: American
Description
Dill Pickle Ranch Chicken Taquitos are a crispy, flavorful appetizer featuring shredded chicken mixed with tangy dill pickles, cream cheese, and ranch dressing, all rolled up in small tortillas and baked to golden perfection. Perfect for game day or a tasty snack.
Ingredients
Filling
- 2 cups cooked chicken breast, shredded
- 1/2 cup dill pickles, finely chopped
- 4 ounces cream cheese, softened
- 1/3 cup ranch dressing
- 1/2 cup shredded cheddar cheese
- 1/2 cup shredded mozzarella cheese
- 2 tablespoons fresh dill, chopped
- 1/2 teaspoon garlic powder
- 1/2 teaspoon onion powder
- Salt & black pepper, to taste
Assembly
- 12 small flour tortillas (6-inch diameter)
- Olive oil spray
Serving
- Extra ranch dressing, for dipping
- Chopped fresh dill & sliced pickles, for garnish
Instructions
- Preheat Oven: Preheat your oven to 425°F (220°C) and line a baking sheet with parchment paper to prepare for the taquitos.
- Prepare Filling: In a large mixing bowl, thoroughly combine shredded chicken, chopped dill pickles, softened cream cheese, ranch dressing, shredded cheddar and mozzarella cheeses, chopped fresh dill, garlic powder, onion powder, salt, and black pepper until the mixture is well blended.
- Assemble Taquitos: Lay each tortilla flat and spoon approximately 3 tablespoons of the chicken mixture along the bottom third of the tortilla. Roll tightly to form a taquito.
- Arrange on Baking Sheet: Place each rolled taquito seam-side down on the prepared baking sheet. Lightly spray the tops with olive oil to help them crisp up during baking.
- Bake: Bake in the preheated oven for 22 to 25 minutes, or until the taquitos are golden brown and crispy.
- Serve: Allow the taquitos to cool slightly before serving. Serve with extra ranch dressing for dipping and garnish with chopped dill and sliced pickles as desired.
Notes
- For extra crispiness, turn the taquitos halfway through baking.
- You can substitute flour tortillas with corn tortillas for a gluten-free option.
- Use cooked shredded rotisserie chicken for a time-saving shortcut.
- Adjust the amount of garlic and onion powder according to your taste preferences.
- Store leftovers in an airtight container in the refrigerator for up to 3 days; reheat in the oven for best texture.
